
Three Layer SSS in Blender Demystified
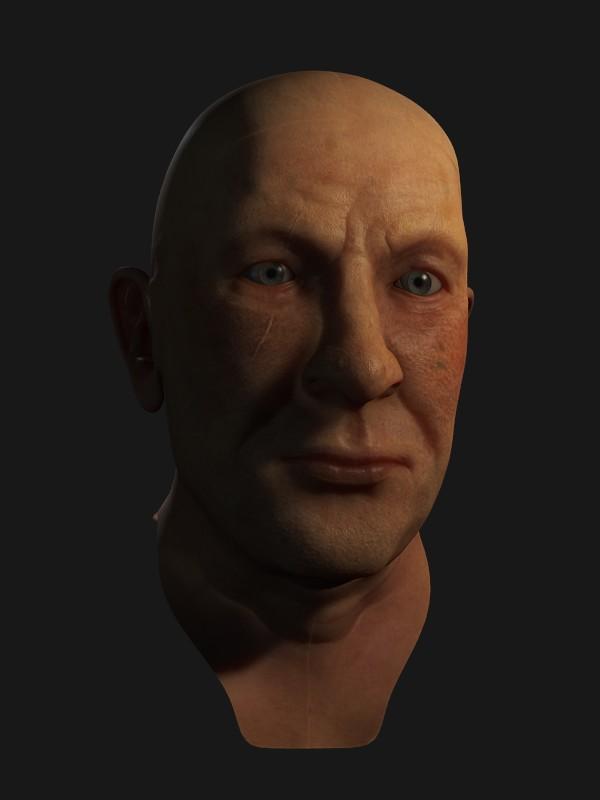
Something that gives a lot of people trouble when creating characters is implementing convincing subsurface scattering (SSS). Blender’s SSS shader comes with a wealth of options that make it easy to customise how light scatters under a surface, but also makes it tough to hit on what options exactly make for convincing skin. Using a node based approach, one can create a three layer SSS shader that gives good, and reasonably physically correct results, and also makes making adjustments fairly straightforward. in this tutorial I use blender 2.5, but I used almost the exact same setup for my blending life entry in 2.49 and got much the same results (just without such fast ray-tracing, thanks blender devs!).
The Basics
A three layer SSS shader emulates skin by splitting the effect of the different layers of skin into different materials:
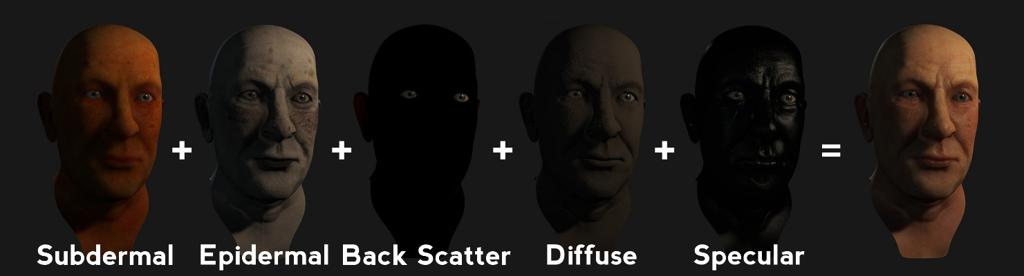
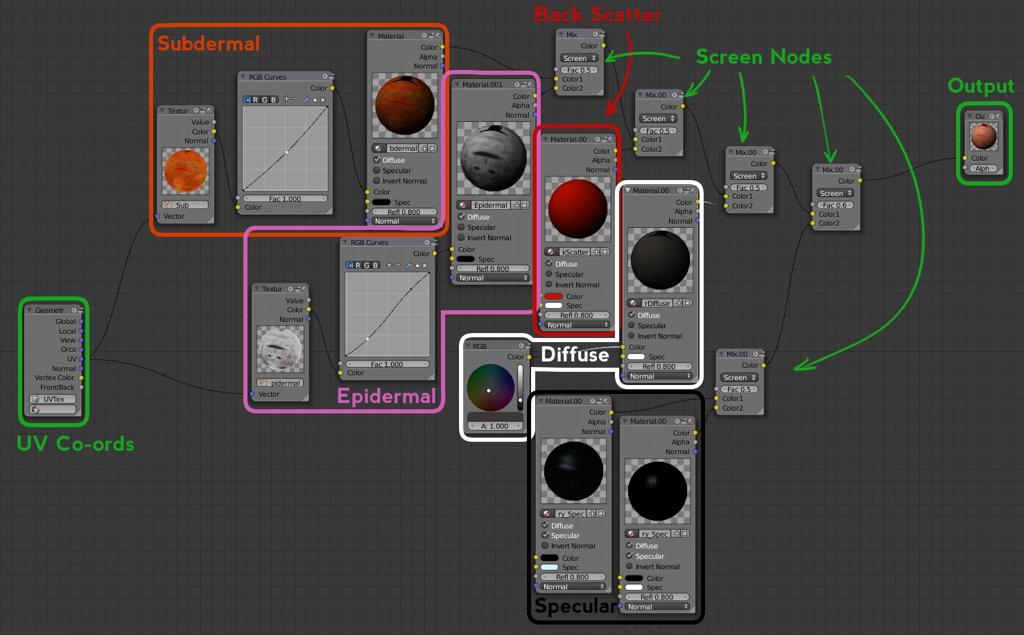
These are added together in the material node editor, primarily using screen nodes (UPDATE: or add nodes, see my note at the end) so that the light from each layer is added to that of the layer below, resulting in the final composite material. Click for full size:
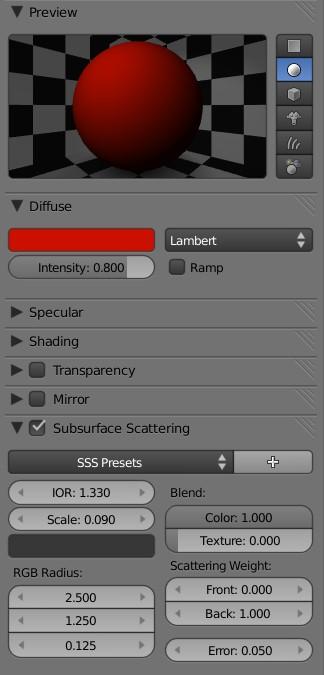
Important SSS Settings
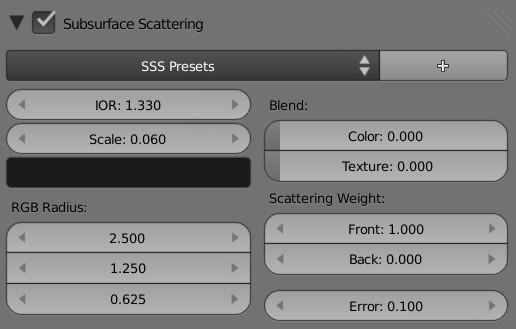
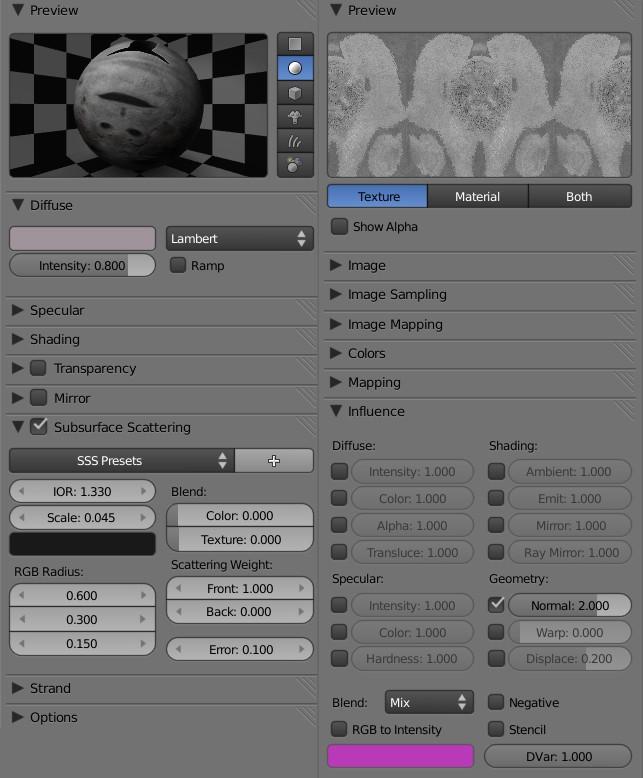
- IOR: Index of refraction - this is the same as the IOR for raytraced reflection and refraction, and reflects the IOR of the medium. As people are about 60% water, and the IOR of water is 1.3, this is a suitable value to use.
- Scale: This is the big one. This is really important to get right as it will determine how far light scatters through the skin, and is the difference between looking like wax and getting nice skin. A scale of 1.0 means that one blender unit equals one millimeter - this is obviously way too large for most scenes. The average head is around 20 to 25cm tall, which would mean that if you scaled your head to exactly one blender unit high, that a value of 0.004 would give correct results. In general you may want to try a bit of tweaking to get the right results. Adjust accordingly for the size of your model according to this formula: size in blender units/real world size in millimeters = scale value.
- RGB radius: This allows you to set the relative scattering amounts for red green and blue light, in proportion to the scale value. This is important for skin as different colours of light scatter by different amounts under the skin. As a good rule of thumb, red light scatters the most, green light half as much as red, and blue light half as much again. So values of 1.0, 0.5 and 0.25 for red green and blue respectively should give good results.
- Colour: Colour influence. This controls how much the RGB colour picker in the SSS setttings affects the scattering, as a rule I generally set the colour to a dark grey to tone down the effect, and the colour value to 0. This is because we want the colour of the scattered light to be determined by our textures, not a generic colour all over the model. Not that even with the colour slider set to zero the, the colour you choose in the picker above will still affect the scattering.
|* Texture: This is another important one. It’s more of a personal preference than the others, as this setting determines how much your textures are blurred by the scattering, higher values will blur the texture more. I prefer to leave this set to zero, as I like my textures to look crisp and I feel that this washes out the detail, particularly in the lower layers like the subdermal, but feel free to experiment. - Scattering Weight: These determine the relative amounts of scattering from the front and back of the model. Because we are splitting up our three layer shader to isolate these effects, for the subdermal and epidermal material set front to 1.0 and back to 0.0. and for the back scatter material set back to 1.0 and front to 0.0. For further explanation of these settings, check the blender documentation.
Subdermal
You will note, that there are in fact more than three nodes. The three layers refer to the three different material nodes that use subsurface scattering. The first - the subdermal layer - simulates the light that penetrates to the deep layers of the skin, and spreads out the furthest. This light gets mostly absorbed by the skin, and only the deep red/orange colours of the blood and tissues are re-emitted. This is the most important layer for giving the material those rich saturated shadows that we see in natural skin. This is also the layer with the most important textures - as the subtle patterns of veins and capillaries, fatty tissues and bony areas beneath the skin are what give it much of it’s realism.
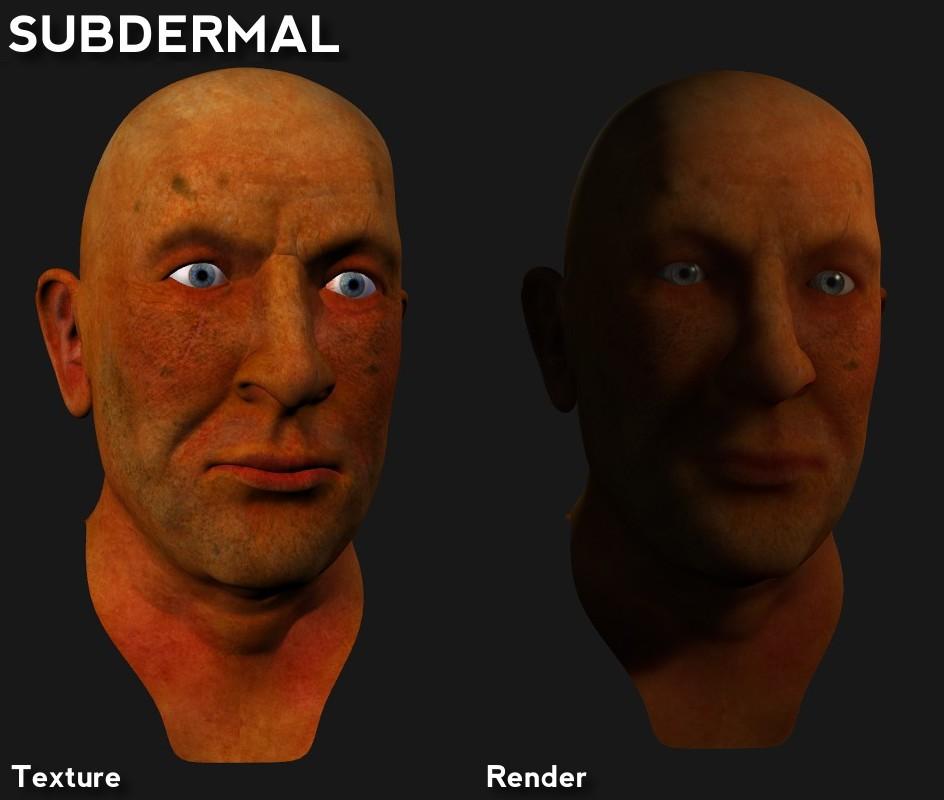
Settings: This layer is the most translucent, so I give it a slightly higher scale value to increase the scattering distance. In theory this isn’t quite correct as the scale should be the same for all the layers. However in practice it is easier just to adjust the scale value, though you can also tweak the RGB scattering radii separately. Apart from that this layer is very simple. The subdermal texure is applied by means of a texture node mapped to the colour channel of the material node, using th UV output of the geometry node to correctly map the texture. No bump map is needed in my opinion as this layer is technically below the surface of the skin anyway, but if you are using a normal map to add mid-level detail such as creases and wrinkles, then that can be applied to this material.

Epidermal
This layer simulates the scatttering in the thinner epidermal layers of skin. The light that gets reflected from this layer has a more blueish tinge. The thickness of this layer varies widely - in areas like the eyelids and lips it is much thinner and so more of the subdermal layer shows through. This is reflected in the texture by colouring these areas more darkly. Because this is added to the subdermal layer by means of a screen node, darker areas on the texture mean that less is added on top of the sub dermal layer, allowing the redder subdermal colours to show through more.
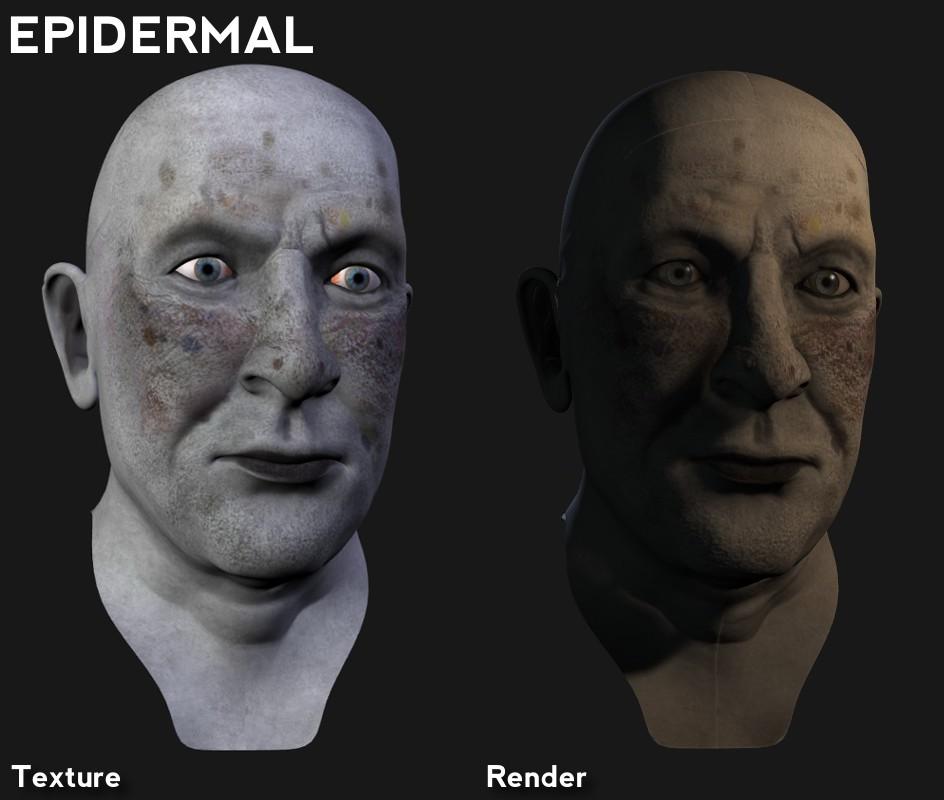
Settings: Another fairly simple material, the epidermal colour texture is mapped via a texture node as before. The scale value is set slightly lower, as light scatters less within this layer. This time as the epidermal layer is a surface layer, you may want to apply a bump map.
Back Scatter
In areas such as the ears where the skin protrudes from the face (and other areas on the body like the gaps between the fingers), light may shine through the skin from the far side, giving it a reddish glow. In order to be able to tweak this effect separately, we isolate it from the other SSS materials by turning their back scatter values down to zero, and instead use a separate back scatter material node to control this aspect of the skin individually. This material does not really require a texture, as the colour is determined largely by the thickness of the skin the light has to shine through. This is a more subtle part of the material, and indeed may not be visible at all in many well lit environments. It tends to be most obvious when the subject is lit from behind.
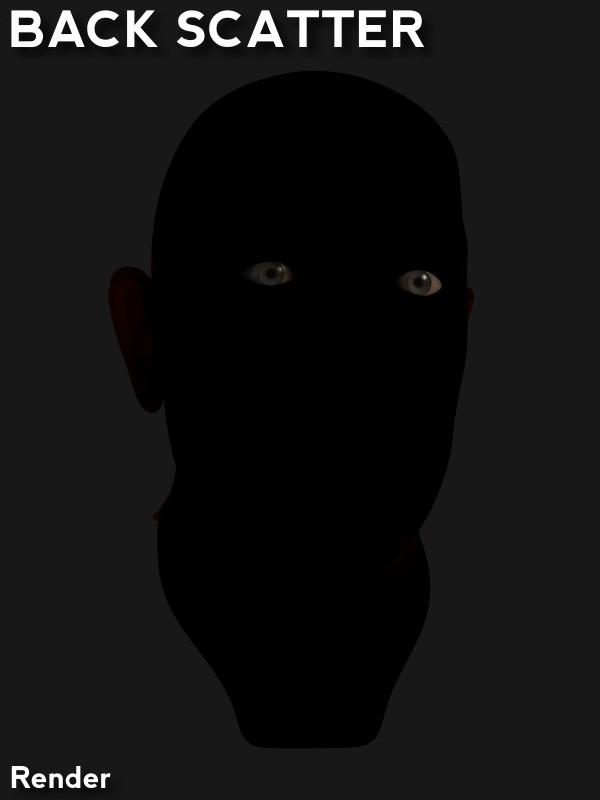
Settings: This is a really simple material. no textures, just a basic SSS shader with only back scattering. Unlike the other materials, here we use set the colour setting in the SSS panel to one. Set the scale value quite large, as this layer is for light scattering all the way through the skin (Again: I know this isn’t physically correct, but it a nice easy way to tweak the result).
Diffuse
This material consists of the simple, diffuse reflected light from the skin, rather than that which is absorbed within the skin and re-emitted (so no SSS is required for this material). If you were to imagine a plaster of paris mask of the person, this is all the light you would see reflected (apart from specular reflections, which we will come to in a minute). This layer can be used to tweak the colours of the skin, to add pigmentation or makeup, and to “fix” any areas you don’t like. Unlike the other layers you can experiment with different mix modes in the node editor to get different effects - you could keep it to a simple screen mode to just add a bit of diffuse light, or set the mode to mix to allow you to add darker colours as well.
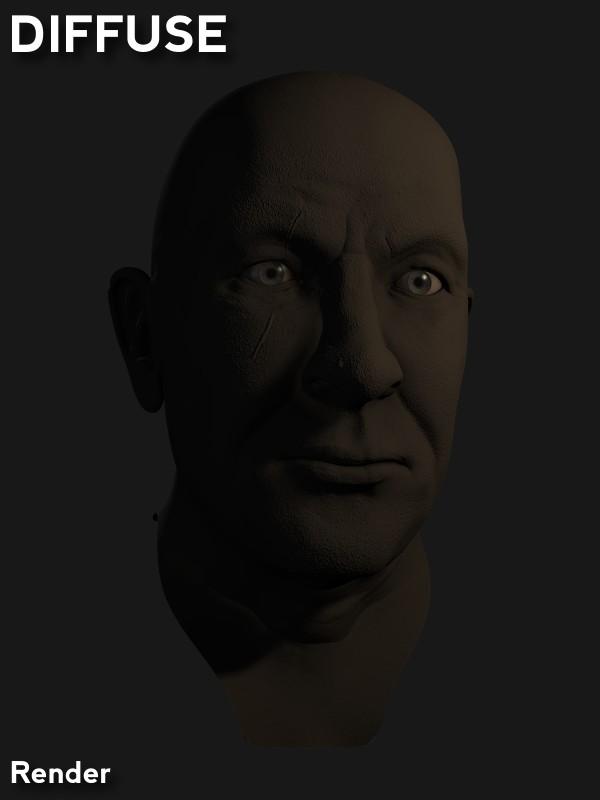
Settings: This is just a super-simple Lambert diffuse shader, no specular, no SSS. Incidentally, this makes it an ideal material just for checking out how your lighting looks without having to wait ages for a full SSS render, just plug the output from this material node directly into the output node in the material node editor to see how your model looks without textures and shaders applied. This can be really useful when trying to troubleshoot renders that don’t look right.
Specular:
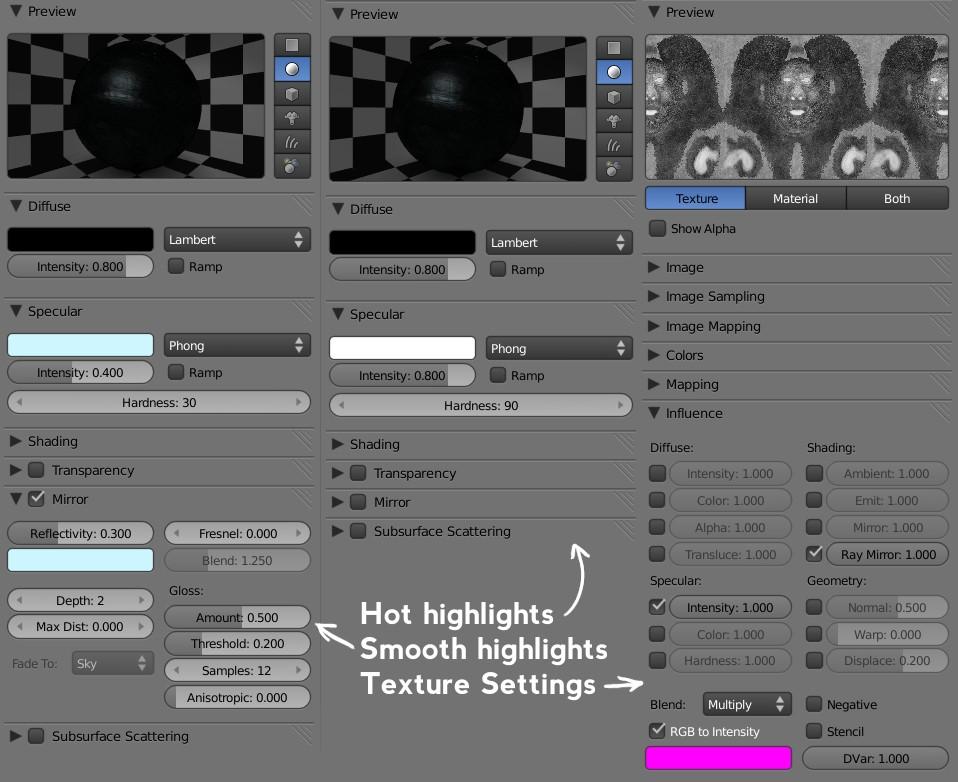
This layer is for the shiny reflections (both specular and mirror reflections, an artificial distinction in reality). The diffuse colour for this material is matte black, with reflection set to zero, as we only want specular and mirror reflections from this material. The shinyness of the skin varies over the face, with more oily areas such as the forehead, brows, and the bridge of the nose, and wet areas like the lips and around the eyelids reflecting more. We can control this by using a specular map - darker areas on the map reflect less, and the bright areas such as the lips and nose will give nice shiny reflections.
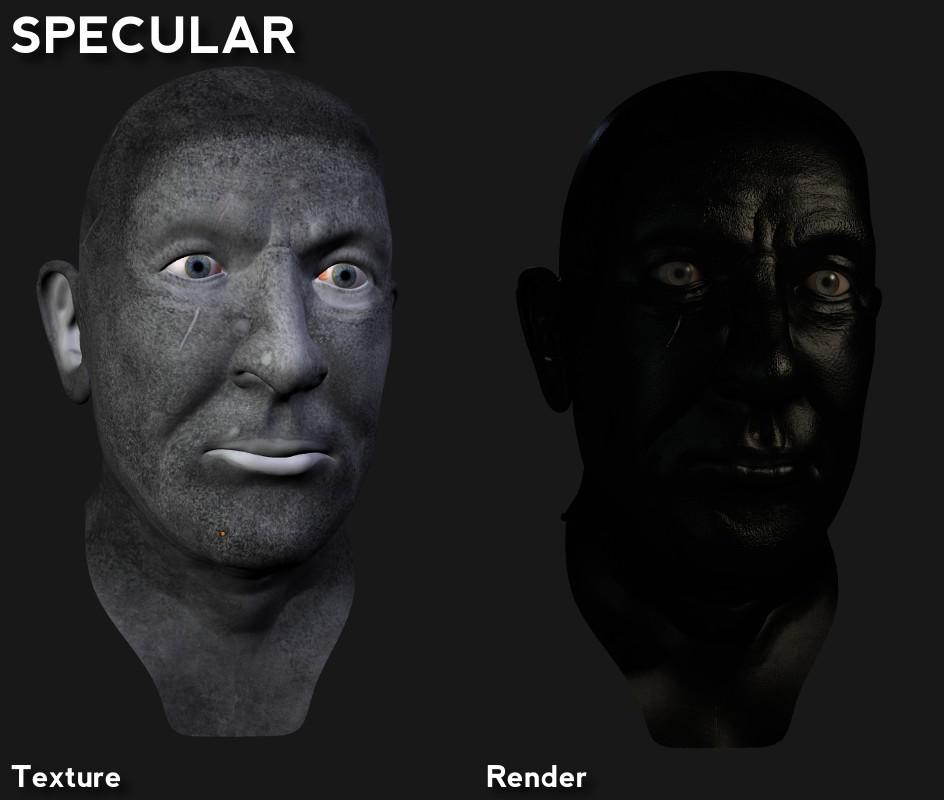
This texture is mapped to the specular intensity and ray mirror (if you are using ray tracing) channels, set the blend mode to multiply to allow you to to control the maximum specularity using the materials settings, and the relative specularity of the different areas of the skin with the texture. In my node setup, I actually blend two specular materials together, one with a high hardness (around 90) and no ray mirror for the small “hot” highlights, and one with a low hardness (down around 30) and mirror reflections to give a more general spread out shine to the skin. The same specular texture is applied to each and they are added together with a screen node.
Other textures:
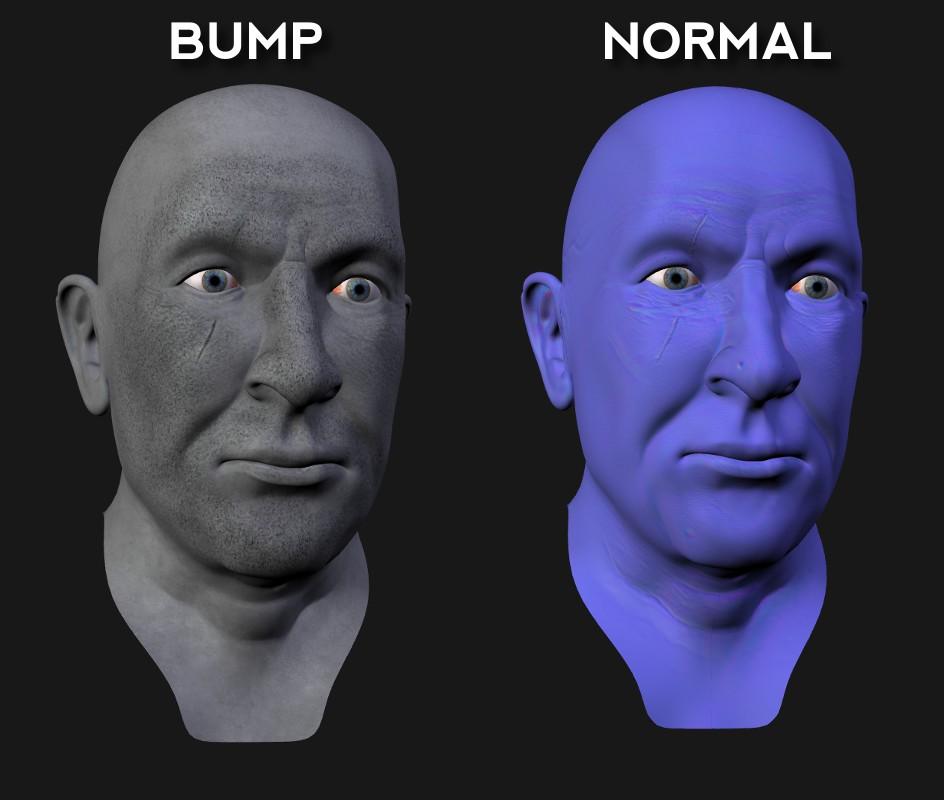
The only other texture required is the bump map, which I mention above should be applied to the epidermal, diffuse and specular materials to give the surface some detail. Also if you have a normal map texture (for example baked from a high res sculpt, or if you simply prefer normal maps to bump mapping) then this should definitely be applied to the surface layers (diffuse, epidermal, specular), and potentially to the subdermal layer too depending on what level of detail is present in it.
Acknowledgements:
A lot of what I know about SSS I learned from Maqs and Pixelvore on the blender artists forums. In particular Maqs’ SSS shader tests are brilliant, and whilst a lot of the links are broken now, his thread is an excellent source of information.
Questions?
If you have any more questions, leave them in the comments and I’ll do my best to answer.
Add vs. Screen Nodes:
Francois Tarlier points out that if you are working with blenders colour management turned on, then you should use add mode to mix the materials rather than screen. This is because screen is sort of a cheat for working with un-gamma corrected textures. I originally made this shader using 2.49 for my blending life entry, and as 2.49 doesn’t have a nice way of gamma correcting textures (and I’m too lazy to do it in GIMP) I found screen worked better. With 2.5s new colour management I agree with Francois that add mode is more correct. Here is a bit of a comparison for those interested: [](/images/old/final_comparison.jpg
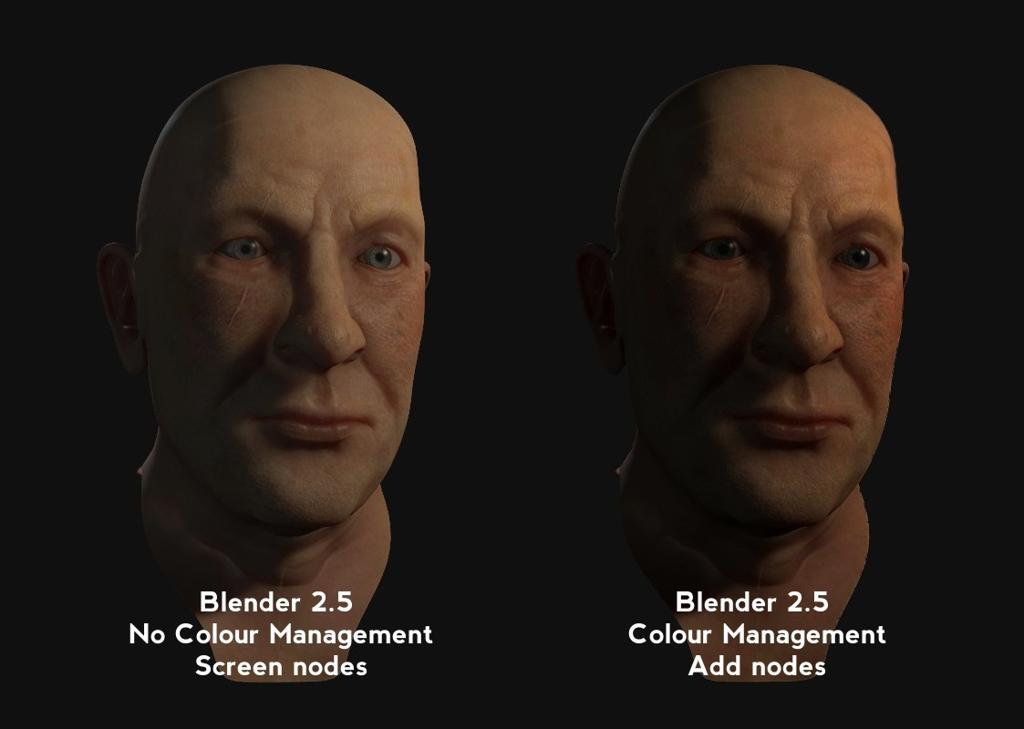
On the left we have a colour management turned off, but a gamma correction of 0.45 (1/2.2) applied in the compositor in post, and screen nodes used to combine the materials. On the right we have add nodes use, and colour management turned on. I think the latter looks a bit better. It’s a bit of a false test though - I usually end up doing a fair bit of adjustment in the compositor in post anyways (I even did a quick brightness and contrast adjustment to both of these in the GIMP, though the exact same correction was applied to both) to get a render looking how I want. Neither looks like I would want straight out of the box. Blendfile: If you want a blend file to get you started, a pared down version of the shader used for this tutorial is avaliable at blendswap.com. However, be aware that this is just the basic shader, and proper textures are a must for good results.
Comments
francoisgfx (May 31, 2010)
Nice explanation makes me wonna give a try!
I think it should be Add instead of screen at least in blender 2.5 if you are working w/ color management. Check out my linear workflow post on my website!
francoisgfx (Jun 01, 2010)
great reference on how maps should look like : http://gl.ict.usc.edu/Research/LFR/
you are incredibly close man !
bensimonds (Jun 01, 2010)
That’s an excellent find. Thanks for that!
ccherrett (May 31, 2010)
Well done. Thank you for the explaination!
bensimonds (May 31, 2010)
Thanks. I should point out I work without colour management, I find I can’t get the blacks looking right with it turned on. I still do gamma correction afterwards though. As far as add vs screen is concerned I’ve tried both and I find screen works better, that’s all. I prefer it because it seems to prevent the values topping out too soon.
Juan Romero (Jun 01, 2010)
We can’t see the effect of back scatter on your image, you should put a light behind the subject even if it’s just for demostrative purposes.
bensimonds (Jun 01, 2010)
If you zoom in you should see some deep red areas on the ears and around the edges of the head. It is subtle though.
invertedNormal (Jun 01, 2010)
love the technical explanations that accompany the settings.
great tutorial!
thank you very much
cheers
brian
francoisgfx (Jun 01, 2010)
oh come on, you didn’t knew about those research, and yet you got so close to the result ?! seriously !?
Then checkout this paper : http://gl.ict.usc.edu/Research/FaceScanning/EGSR2007_SGI_high.pdf
It gives a lot of information about skin layer seperation (especially page 9)
Well I guess Debevec is going to become your new friend now ^^And while I’m on papers topics, some small but really nice detail info sometimes very hide in those one :
http://http.developer.nvidia.com/GPUGems3/gpugems3_ch14.html
http://developer.download.nvidia.com/presentations/2008/GDC/slides-nvidia_advanced_skin_173.mov
http://developer.download.nvidia.com/presentations/2007/siggraph/advanced_skin_2_sigg07.ppt
especially about specular & oil values as blur stuff too…
Wasa (Jun 01, 2010)
Nice job!
A few comments, the final images, the first looks very pale, and the second looks sunburned, maybe an average of these two would look even better
Also there is a weird artifact where the nose joints the face on the shadow side
It’s hard to tell if this is a rendering artifact or caused by errors in the anatomy and lighting angle.
With that said, thank you very much for sharing your expertise, this is definitely getting bookmarked.
loramel (Jun 01, 2010)
Thanks a lot for putting this together. Its so much more informative than just using a blend file and trying to figure it out by yourself :). It will certainly come in handy for my current short film project once I start with the texturing.
Did you actually use raytracing in your pirate project ?
bensimonds (Jun 01, 2010)
Yes I did. As it was a still image I didn’t mind the render time, and it allowed me to use area lamps with nice soft ray traced shadows. I find it gives the nicest results working with hair, although now that 2.5 had deep shadow maps it is probably less necessary.
I look forward to hearing about your short film project!
bensimonds (Jun 01, 2010)
They don’t look quite right, as I say I would normally do more post work to get the effect I want. What it does show however is that the colour management version with add nodes maintains richer colours and deeper shadows when done correctly vs the non-colour managed version. Something previously I had to spend time fixing in the compositor.
francoisgfx (Jun 01, 2010)
yes I understand, blacks are usually a bit more tedious to work with. But still in your comparison I prefer the redish skin with Add & CM. This is great, because I never did the test before to compare both, I just know theoretically it is supposed to be like that (on a physic & math base at least), but never did the try.
Great job mate !
francoisgfx (Jun 01, 2010)
subtle is good my friend :)
Rickyblender (Jun 01, 2010)
like the technical description nicely done
i wold suggest one thing if possible
if you could have a sample blend file somewhere that we can download for some skin material that we can look and study and may be used on a model
would be easier and faster to test and see the results on modelalso some details on the best lighting set up to see this SSS
this might be a good wiki page to add
keep up the good workthanks & happy 2.5
bensimonds (Jun 01, 2010)
Done. You can find a blend file here: http://www.blendswap.com/3D-models/materials/bens-three-layer-sss/
Riko (vfx’n’3d) (Jun 01, 2010)
Very useful post!
Thx you!
rickyblender (Jun 01, 2010)
thanks for the sample file with suzanne
i looks caerfully at the details and i can see the only mat with 2 users
not certain if this comes with the added mat in node editor mat!
so why is there 2 users hee?now you say to set scattering with different values for the front and back
but how and where do you do that ?
i mean do you select the epidermia and the other one ig uess the derm and where to set this?i did another experiment here i added a spot light behind the ear and check if the skin was more or less transparent and in your model it does not matter
is this normal ?Tanks & happy 2.5
bensimonds (Jun 01, 2010)
The blendfile is just the basic node material setup (and child nodes). You will need to add the textures and set the values according to your scene yourself.
Sena (Jun 01, 2010)
Nice work, always wondered how to make a realistic skin. Continue with this beautiful work in Blender.
Top Posts — WordPress.com (Jun 02, 2010)
[…] Three Layer SSS in Blender Demystified Something that gives a lot of people trouble when creating characters is implementing convincing subsurface scattering […] […]
Wasa (Jun 02, 2010)
Ah ok, I didn’t have time to give the article a proper reading before posting. :)
Dica- Blender 2.5 shader SSS skin « Jafapt's Blog (Jun 02, 2010)
[…] artista Bens Simons criou um pequeno tutorial(clique aqui) onde nos explica como funciona o shader SSS skin do Blender, para quem não sabe para o que serve […]
Paul (Jun 03, 2010)
Hey I have a question to the specmap. First of all, your tutorial (and your character) is very good. It helps me a lot. But I have problems with the spec map. Is it a hand painted map, or is there any othre way to generate it ( like the difuse map). Greetings paul
bensimonds (Jun 03, 2010)
It is a hand painted map, - the main areas to think about are those extra shiny parts like the lips and the bridge of the nose. It’s actually one of the easier maps to paint. You can also start off using your bump or diffuse map as a base. if you invert it and take the brightness down low it makes quite a good starting point for laying out the shinier areas.
Paul (Jun 03, 2010)
Ok. Thanks a lot
Benjamin Bailey (May 12, 2011)
Awesome. Thanks for the explanation, man! :)
Martin Lubich (Sep 17, 2010)
Thanks Ben !
I’ll try this approach.
bensimonds (Sep 17, 2010)
I built the textures from the base upwards, which worked quite well, as the subdermal layer defines mostly the global colour and texture, so painting this first made sense.
Then I added in the larger patterns on the epidermal layer (such as darker areas where the subdermal colours showed through more, as well as spots and moles etc.
You can render at any stage to get an idea of what your progress looks like, just assign what textures you have and set the rest of the layers to use a flat colour.
Martin Lubich (Sep 17, 2010)
Hi Ben
As I am starting now with the face texturing in my short, I have a quick question about your workflow.
What I currently find hard to visualize is this: I have a specific end result in mind, but its hard to determine the changes needed to each layer to achieve this look.
How was your iteration loop ? Paint a change in one of the maps, render it out and check the result ?
I had a quick look at the skin shader of an early model of sintel, which is not quite as elaborated as yours. They put the major color information into one layer, which from an artistic point of view is better to handle, but may give inferior results. But then with a short you can go away with it.
I would be really interested how you approached this topic.
Benjamin Bailey (Sep 16, 2010)
Great work, Simonds. I’ve finally gotten around to reading the whole thing.
I do have one question, though: what do you mean by saying the normal map “then this should definitely be applied to the surface layers”? I’d definitely like to be able to use a normal map in my setups, but I’m not sure what you mean…?
Thanks!
bensimonds (Sep 16, 2010)
What I mean is that depending on the scale of the details baked into your normal map, it may or may not be worth applying it to your subvdermal and epidermal layers.
If it only has very fine details, then these will probably get washed out by the scattering on deeper layers anyway, so it may be best just to apply it to the diffuse and specular layers. On the other hand if your model is quite low poly and the normal map adds definition to some major areas of light and shadow in the final render, then it should be applied to all the layers to get better results.
Blending multilayer skin « Blending in Limbo (Sep 08, 2010)
[…] were be no lights placed behind the head in the final image. One can be added if necessary. Ben Simonds covers backscattering in the tutorial for his skin […]
Ben Simonds (Jul 20, 2011)
Diffuse = colour. It’s just the “col” texture channel of a material.
Jose Ramirez (May 25, 2011)
Hello! i am really interest in this tutorial but can you give some help about the textures of each layer, there is something special in each texture( color, light, contrast)?
Ben Simonds (May 07, 2011)
That depends. For the normal map, if it’s only generating fine detail you could probably leave it out from the sub and epidermal layers. The other textures can all be used in generating the diffuse maps for each level.
Infinite Head Scan Skin Testing « BenSimonds.com (Apr 04, 2011)
[…] also did some testing with blender internal using a three layer setup (see my tutorial for more on that), and was pretty impressed at the […]
Ed (May 07, 2011)
Hello, I’ve created my textures in ZBrush and exported Normal, Texture, Cavity, and Ambient Occlusion Maps. Would I apply all of these to the diffuse layer in the shader or should I apply to sub-dermal and epidermal layers as well? Thanks again for the excellent tutorial.
Hairy Maclary Walks Among The Undead « Black Carrot (Mar 15, 2011)
[…] got all the settings from this awesomely useful page. It’s extremely useful and saved me from messing around with the settings […]
Ben Simonds (May 25, 2011)
I just recorded a fairly in-depth video tutorial on this for blendercookie.com. You can find it here: http://www.blendercookie.com/2011/05/23/texturing-and-rendering-an-elf-head-in-blender-part-01/
Hahli (Jul 20, 2011)
Thanks for the tutorial. I wasn’t able to find the old post you talked about in the beginning of this tutorial for blender 2.49.
What do I do about the diffuse part since blender 2.49 doesn’t have that?
Skinshader test » AstroKiste (Jan 15, 2012)
[…] by Ben Simonds the overall shader will […]
Ade (Jan 04, 2012)
Bit beyong me, I’m still on 2.49 and it’s slow ging, I reckon I’ve learnt abot 1% of what Blender can do.
Ben Simonds (Dec 02, 2011)
Good question. This was something that gave me trouble a while ago. For darker skin, it’s less easy to rely on adding together layers - as it can get difficult to tweak. An alternative would be to use mix nodes for the epidermal and diffuse layers and only add the specular and subdermal layers, this would allow you to mix in the dark tones from the upper layers of the skin. Another (simpler) option would be to use a single layer shader and just add your SSS that way.
40+ Highly Useful but Rarely Collected Blender’s Tutorials | Dzineblog360 (Dec 04, 2011)
[…] Three Layer SSS in Blender Demystified […]
Meikel (Dec 02, 2011)
Thank you for the quick reply. So basically it is a matter of the node’s blending mode. I’ll play with that. Do you suggest that the colour tone of the textures may be darker than for the lighter skin?
Publication dans 3Dmag | Manu Creation (Oct 25, 2011)
[…] du shader de peau multi-couches SSS. Pour les anglicistes, je vous conseille vivement le site de Ben Simonds où vous pourrez en apprendre un peu plus sur ce type de matériaux à plusieurs […]
Meikel (Dec 01, 2011)
Hello Ben,
thanks for this highly enlightening piece of information! I was just wondering what settings or textures I do have to change for a dark/black skintone. I understand that the subdermal texture largely defines the overall skin colour but I’m unsure how this translatets to a black coloured skin.
Can you please elaborate on this?Kind regards,
Meikel.
Meikel (Mar 01, 2012)
Hello Ben,
did you do some research to reproduce the skin within the current cycles renderer (as of blender version 2.62)? My results so far don’t look very promising :-/
So, any suggestions from your side?Regards,
Meikel…
Ben Simonds (Mar 11, 2012)
Currently cycles doesn’t feature an SSS shader type, so skin for now is pretty difficult I think.
Meikel (Mar 11, 2012)
right.
I didn’t manage to reproduce anything remote looking like skin in cycles.
So, we’ll wait for some SSS shader…
Gherard M. (May 15, 2012)
Hey Ben, excelent work! Please how many lights you use for this scene and were exactly! please!. THX!
Ben Simonds (May 16, 2012)
It’s a fairly straightforward three point lighting setup using area lamps. See my lighting article for more about that: http://bensimonds.com/2010/06/03/lighting-tips-from-the-masters/
Steven (Sep 25, 2013)
Is the texture colors uv unwrapped colors added then added with material nodes.
Trying to figure out how you added the colors.
Did you unwrap color it and save it as a png?
Rickyblender (Oct 02, 2013)
SSS is alive in cycles now
so is there a simple cycle file sample at blendswap with the complete set up for all the different mapping layers using suzanne may be
or did you do a tut for using SSS in cyclesthanks
happy cycles
James (Jun 12, 2013)
Wow, fantastic work here! I’ve been trying to do something similar for the Cycles render engine, considering that it now has a Subsurface Scattering Shader. The only issue is that the front and back scattering values can’t seem to be set.
Do you have any idea of how to do something similar in Cycles, at all?
blender, material nodes, materials, node editor, scattering, shaders, skin, sss, subsurface, subsurface scattering, textures, texturing, tutorial, tutorials — May 31, 2010