
Lighting tips from the Masters
What do I know about lighting after all? After my previous post on setting up a three layer SSS shader, a few people asked for tips on how to light their characters to best show them off. As it happens, this something I’m rather interested in, and I’ve had a blog post on the subject brewing for a while, so I’ve finally found the motivation to finally write it up. I didn’t want to spend too much time talking about specific settings for this tutorial, so instead you can download this blendfile from BlendSwap.com for some ideas on the specifics of how to set up your scene. Lighting in portraits is key to how you want your character to be seen. The exact same character with the same pose and expression can be seen in completely different ways depending on how they are lit. They can be made to appear anything from dark and sinister to calm and serene simply by changing the lighting of your scene. On a more subtle level different kinds of lighting will can drastically improve the look of your models, and transform them from drab and uninteresting to dynamic and captivating. I don’t get it right every time, so when I’m looking for inspiration for lighting I usually turn to those who know better. From the great painters and photographers, to Hollywood Films, to modern day CG artists, each can offer insights into what makes for interesting lighting.
Three Point Lighting:
Before delving into some deeper issues, let’s look at what is considered the “standard” lighting setup for a lot of portraiture and cinematography. Three point lighting is the use of three different lights to achieve a pleasant, natural look that is adaptable to a wide variety of circumstances, and gives good results with most subjects when set up correctly.
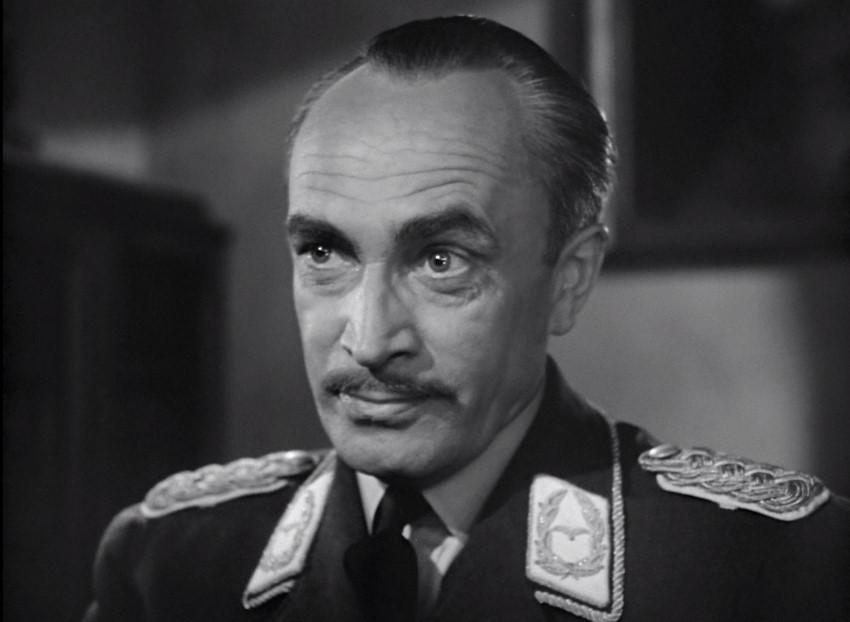
Conrad Veidt as Major Strasser in Casablanca
You should be able to see that the main source of light in the image above is coming from slightly above and to the side of the shot. This is called the “key” light. This provides illumination to most of the face, but were we to only have that one light in the scene, the remainder of the face would be in shadow. For the whole face to be seen we add a second, slightly softer “fill” light from the other side, at roughly eye level. This gives an even illumination to the shadowed parts of the face. A third “back” light (also called a “rim” light) light, positioned behind the subject, is used to highlight the edges of the subject and lift it out of the background.
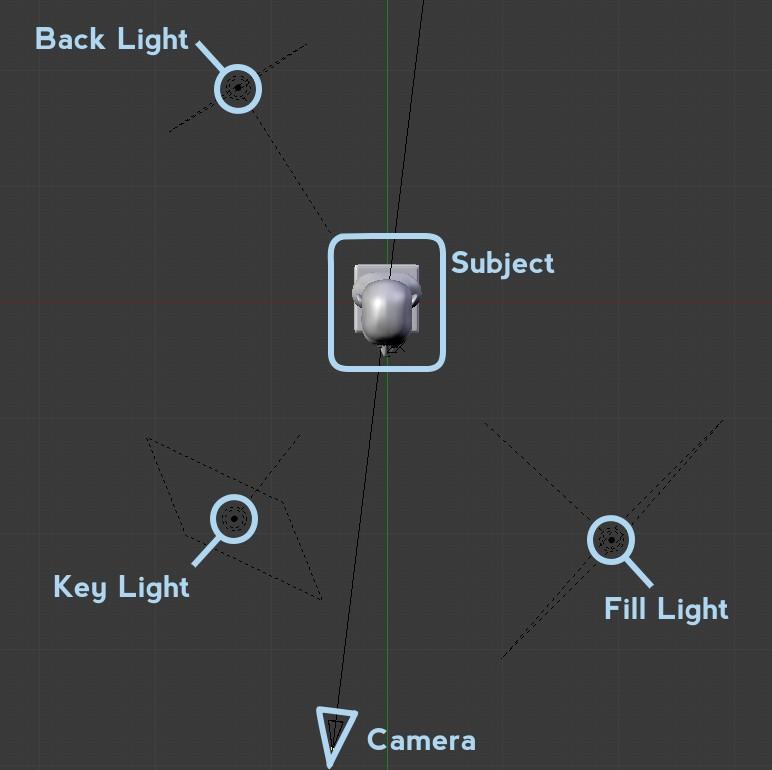
A basic three point lighting setup.
This kind of lighting is easy to do in blender, and is best done using either spot lights or area lights, as these give a good amount of control over the direction and placement of the light, and also have some of the best tools for adjusting the softness of the shadows. Spot lights are preferable for animation, as using buffered shadows allows objects in the scene to cast shadows over each other without resorting to ray-tracing (which would increase render time significantly). Area lights give much nicer soft shadows, but at the cost of much longer render times.
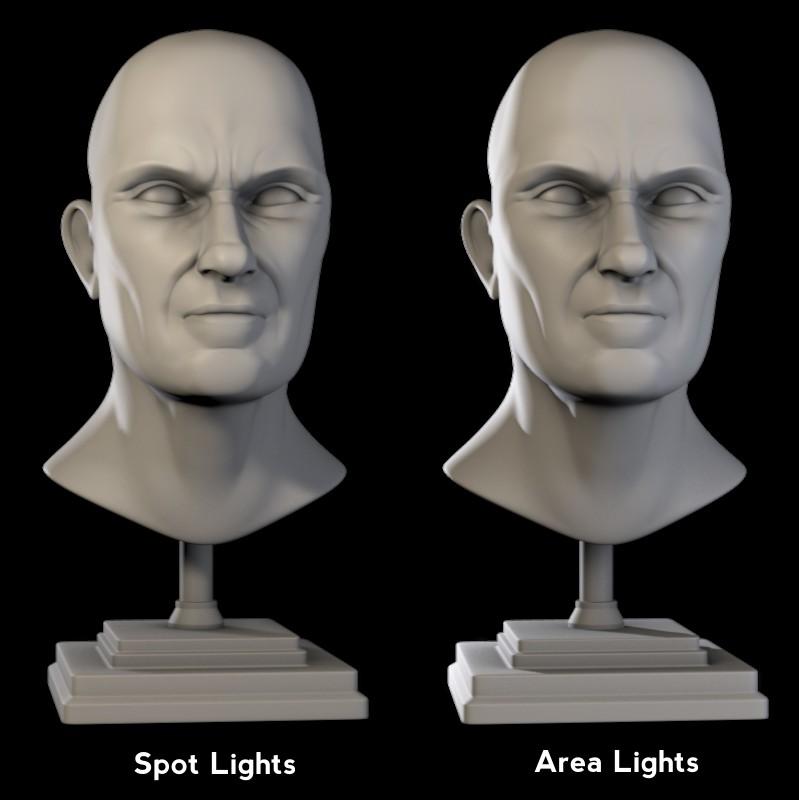
Spot Lamps with buffered shadows vs. Area Lamps with ray traced Shadows.
Rendertimes in Blender 2.5 (with raytraced AO for both) - Spot Lights: 28 seconds. Area Lights: 2 mins 59 seconds.
Hollywood!
Three point lighting is a familiar feature of any film, CG animation or photographers studio today. Originally though, it became popular in the golden era of Hollywood, when film makers wanted to make sure that their sets and actors were evenly illuminated so that movie-goers could see all the money they spent on their productions. Because early colour film didn’t capture contrast between light and dark very well, Directors often used bright key and fill lights that gave very even illumination the actors on screen. Think back to those early technicolor films for examples:
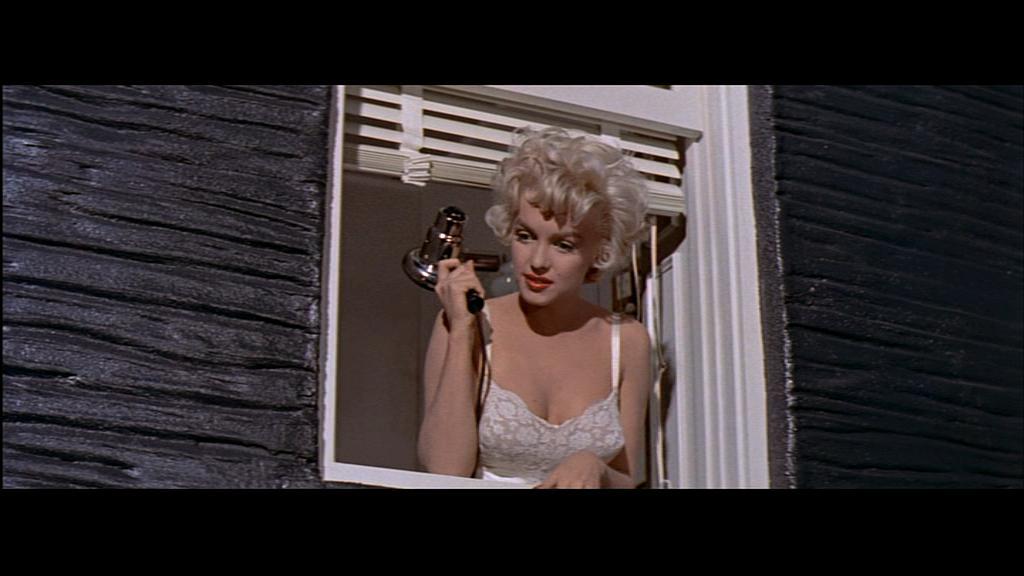
Marilyn Munroe in The Seven Year Itch
This kind of lighting doesn’t have any particularly dramatic qualities, but it does an excellent job of showing everything that is going on in shot. It also shows off texture well (look at the wooden siding in the picture above for example), and looks very natural. Getting this kind of lighting using a three point setup in blender is as simple as setting the fill and key lights to reasonably high intensities and long fall off distances, without much difference in brightness between the two. The back light used in this kind of lighting is reasonably subtle and diffuse, so set the intensity of your back light reasonably low and use fairly soft shadows.
High-key Lighting
Rembrandt
Let’s jump back in time for a second to the the seventeenth century. In Holland at the time, a revolution was occurring in how artists treated light. By this point in time much of the physics of light was understood and was being applied to the art of painting, but the Dutch masters - in particular Rembrandt - started a revolution in the use of light for the exposition of drama and storytelling in their scenes. By thowing light on the elements in the scene they wanted to draw attention to, and throwing elements that were less important into shadow painters could control how people interpreted the scene. This more dynamic style of lighting was also popular in portraiture, particularly because as well as adding plenty of dramatic flair to the image, it also breathed life into the forms of the subject, highligting those that face the light and veiling those that turn away in shadow. This created a lot more visual interest when compared with the more diffuse, flat lighting of a lot of Renaissance art.
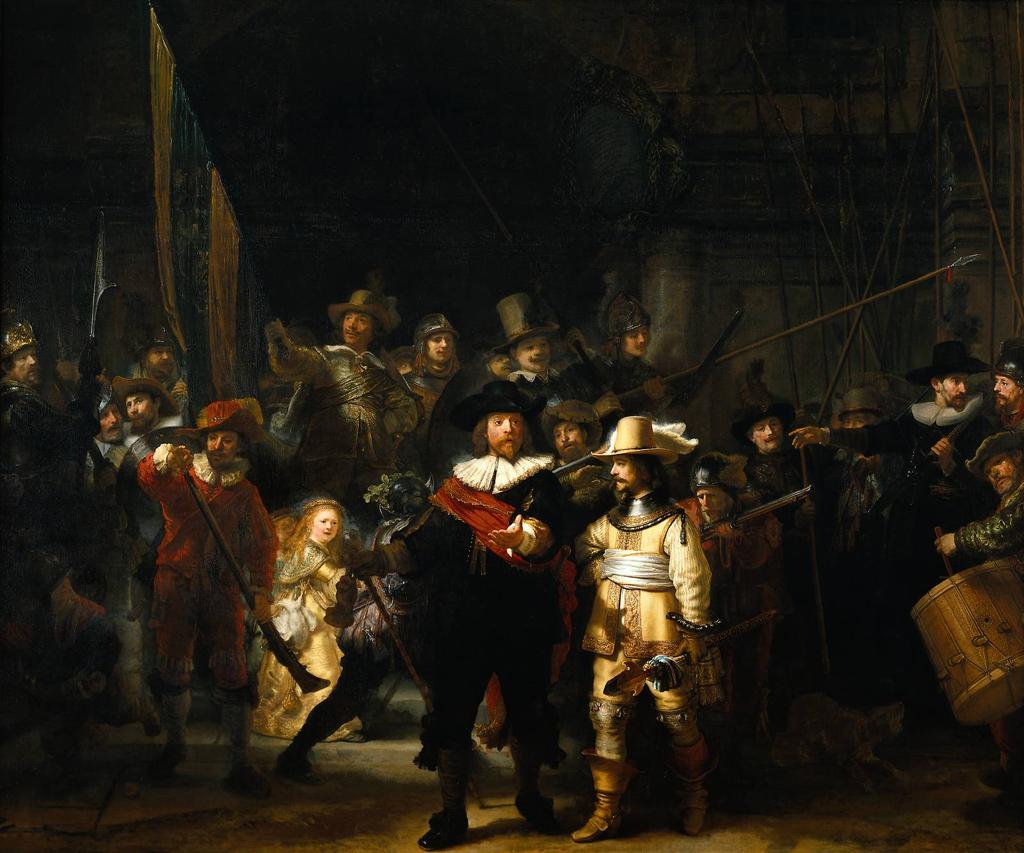
The Night Watch by Rembrandt.
One of his most well known paintings, and a famous example of the use of light to highlight the dramatic elements of the composition. Returning to Hollywood, this kind of lighting rose to prominence first in German Expressionist Cinema and then in the Film Noir era as directors sought to portray their actors in more dynamic ways. It has been popular ever since.
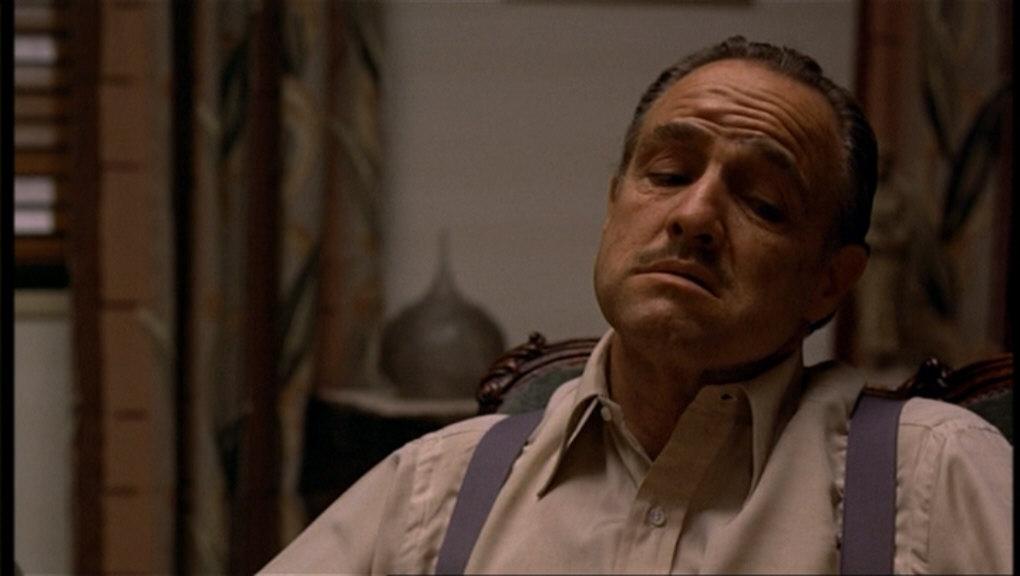
Marlon Brando in The Godfather.
Note the triangle of light under the eye on the shadowed side of the face. This is referred to a as Rembrandt lighting, as it was a common motif in Rembrandts works. Gordon Willis, the cinematographer on The Godfather, specifically cites Rembrandt amongst his influences for the film. In cinematography this is referred to as low key lighting, and can be achieved through our standard three point light set up once again. This time, our key light is much brighter than the fill light (turn the “energy” setting up on the key light), and should have much more pronounced shadows as a result, we can also decrease the size of the lamp (the “size” setting for area lamps, or “soft size” for spot lamps) to make give our shadows much clearer outlines.
Low-key Lighting
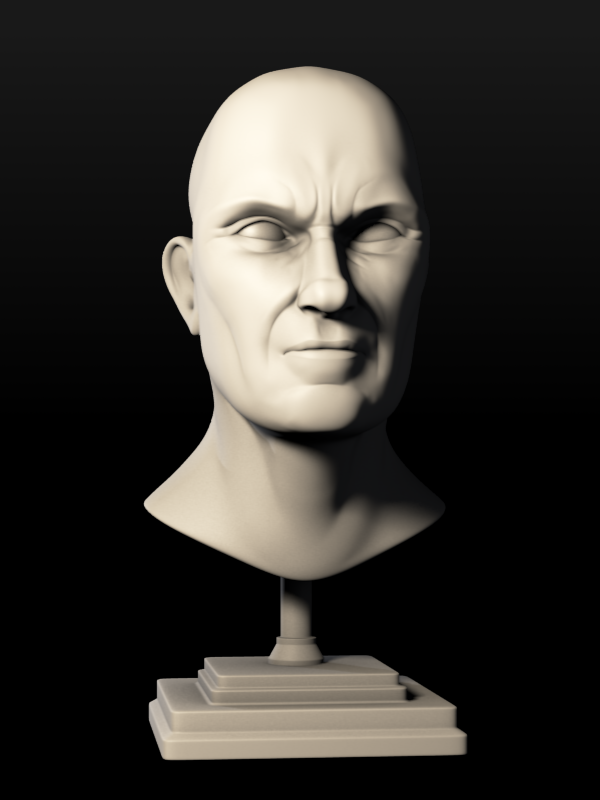
This kind of lighting is ideal for showing off character models, as it higlights the forms and makes them appear much more three dimensional, compared to flatter, high-key lighting. However, by playing up the forms and increasing the contrast, it may make your textures less prominent - something you may want to consider if you spent hours slaving away over a multi-layer SSS shader with detailed textures! Rim Light Up to this point I have largely neglected the third light in our three point setup. Unlike the other two it’s primary purpose is not to provide illumination to any large area of the subject. Indeed, being positioned behind the subject this would be impossible. Instead this light is used to pick out the outlines of the the subject and thus separate it from the background. Rim lights can be very useful in darker scenes where the subject might otherwise fade into the background (of course this may well be the effect you desire, in which case carry on). Rim light is also quite dramatic, and works well in both high and low key lighting.
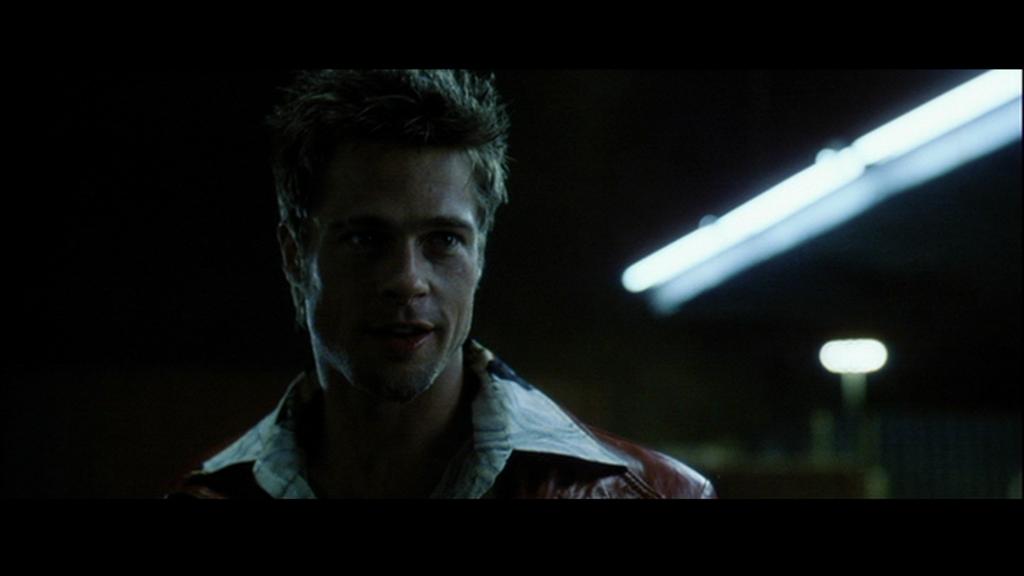
Brad Pitt as Tyler Durden in Fight Club
Much of the film was set in dark, gritty environments, and the use of back lights helped the characters “pop” out of the backgrounds, without requiring bright frontal lighting. I find getting rim lights to give the effect I want in blender is often the most tricky aspect of lighting characters, as searching for the right balance between illuminating the outline, and not spreading out too far over the subject, requires a fair amount of trial and error for the placement of the lamp. Additionally, because the we only see the effects of rim lights at angles that are just glancing off the surface, rim lights must be quite bright in comparison to the main key and fill lights in order to stand out (usually several times brighter, though again this requires experimentation).
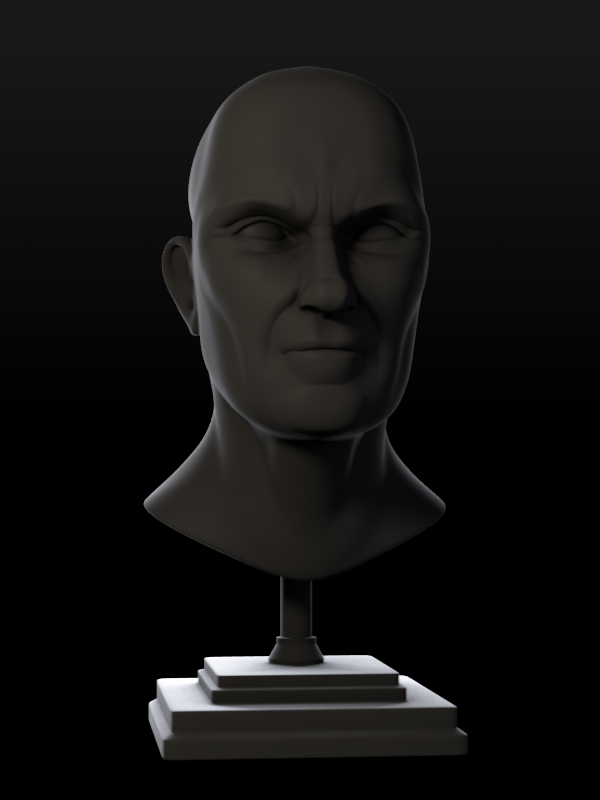
Lit mainly from behind with a large, bright, area lamp, with the shadow samples turned up to 16
Depending on the kind of illumination you want, rim lights may not require raytraced/buffered shadows at all, instead relying only on the angle the light hits the surface. As such the effect of rim lights can also be faked using material nodes.
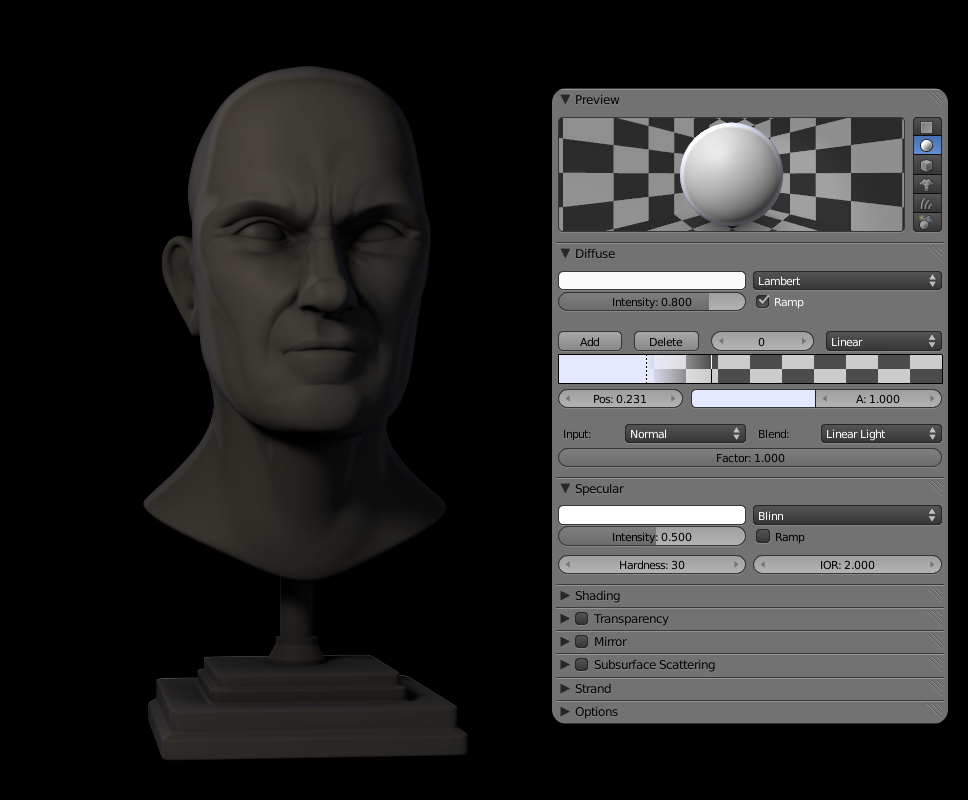
A similar look can be achieved with out a back light
This time a ramp is shader used to give the same effect instead. This is much faster, but doesn’t give quite the same quality.
Colour
Colour theory is of course an entire subject in itself. I shall mention it only briefly here in so far as to say that opposition between the two main lights (fill and key) can create some really nice effects. Opposing colours of course are those on either side of a colour wheel:
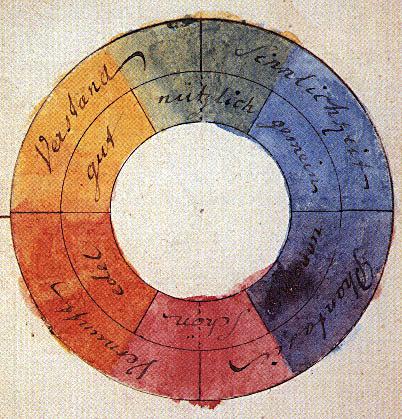
In general opposing colours look good when paired with one another.
Another consideration when thinking about colour choices is how they interact with the subject. Skin is a sort of pinkish-orange colour, and so warm tones like reds and oranges complement it well, the opposing colour to these tones are bluey-green tones, and these also work well, particularly as fill or rim lights. You will note for most of this tutorial I have opted for a key light with slightly orange tint, and fill and rim lights with a blue colour.

Complementary Colours often work well for the fill and key lights, though not all combinations work well when lighting skin tones. The green light on the right would give the skin a very unhealthy look.
Light Direction and Character
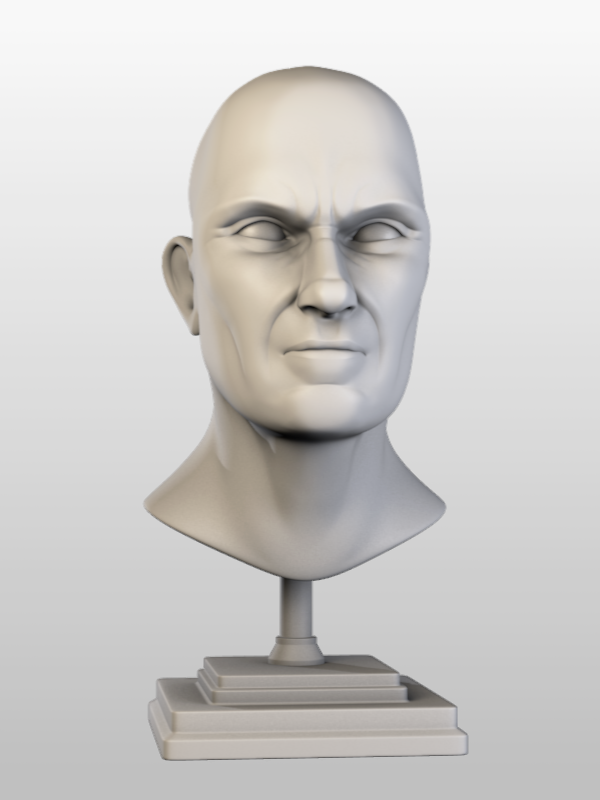
Within any lighting setup, the predominant direction the character is lit from communicates a lot about the character. We are used to seeing people lit by natural light, and so we often find that characters lit from strange angles appear more visually arresting, and often unsettling. Achieving this in blender is a simple matter of positioning the key light to provide light from the desired direction, and having the fill light take an opposing position to provide illumination of the shadowed areas.
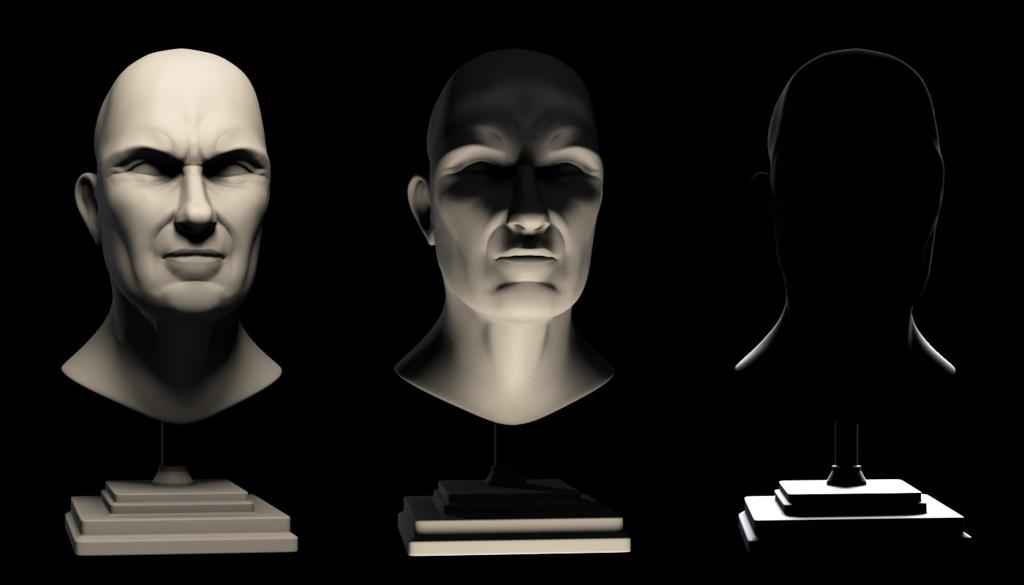
Lighting from above makes characters look dignified and noble, from below makes them look sinister and menacing.
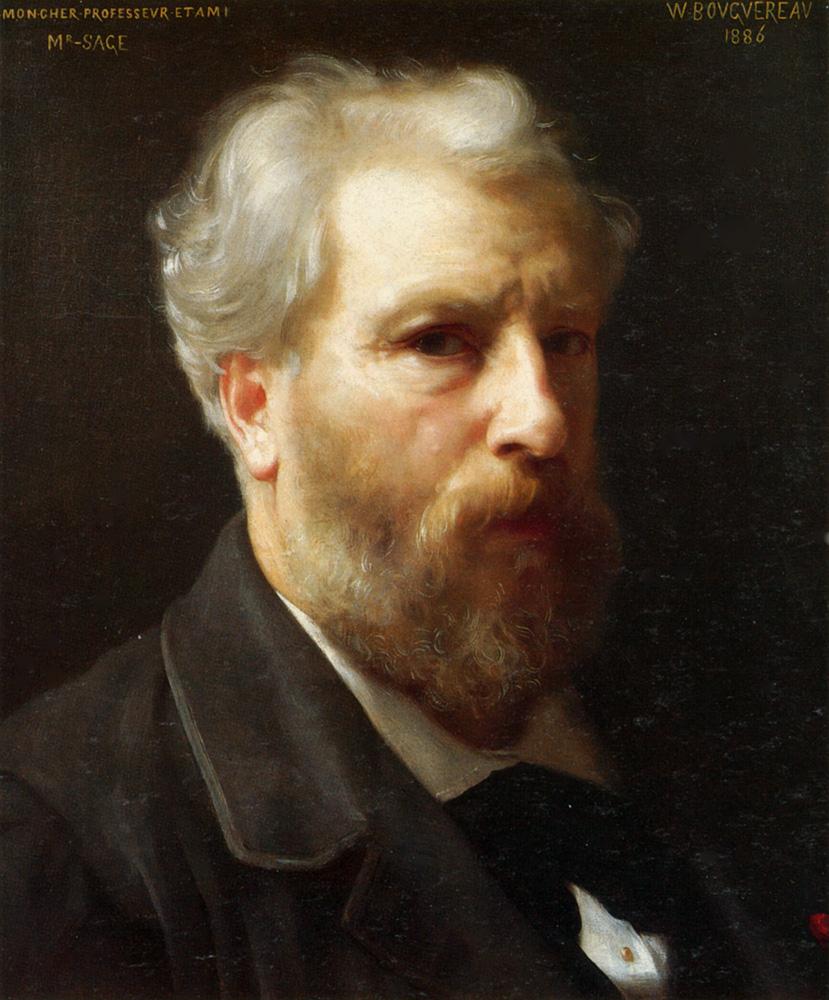
Lighting from behind gives a mysterious outline. Many famous pieces of devotional art use lighting from above to denote divinity, as it simultaneously makes the subject appear more dominant in the scene and at the same time gives the impression of being seen from below - imagine being a small child in a room full of grown-ups and looking up at their faces lit from above by the lights on the ceiling. More diffuse light is used to communicate a more serene and peacefull atmosphere. The master of this style (well, arguably the master of light in general) in traditional art was William Bourguerau:
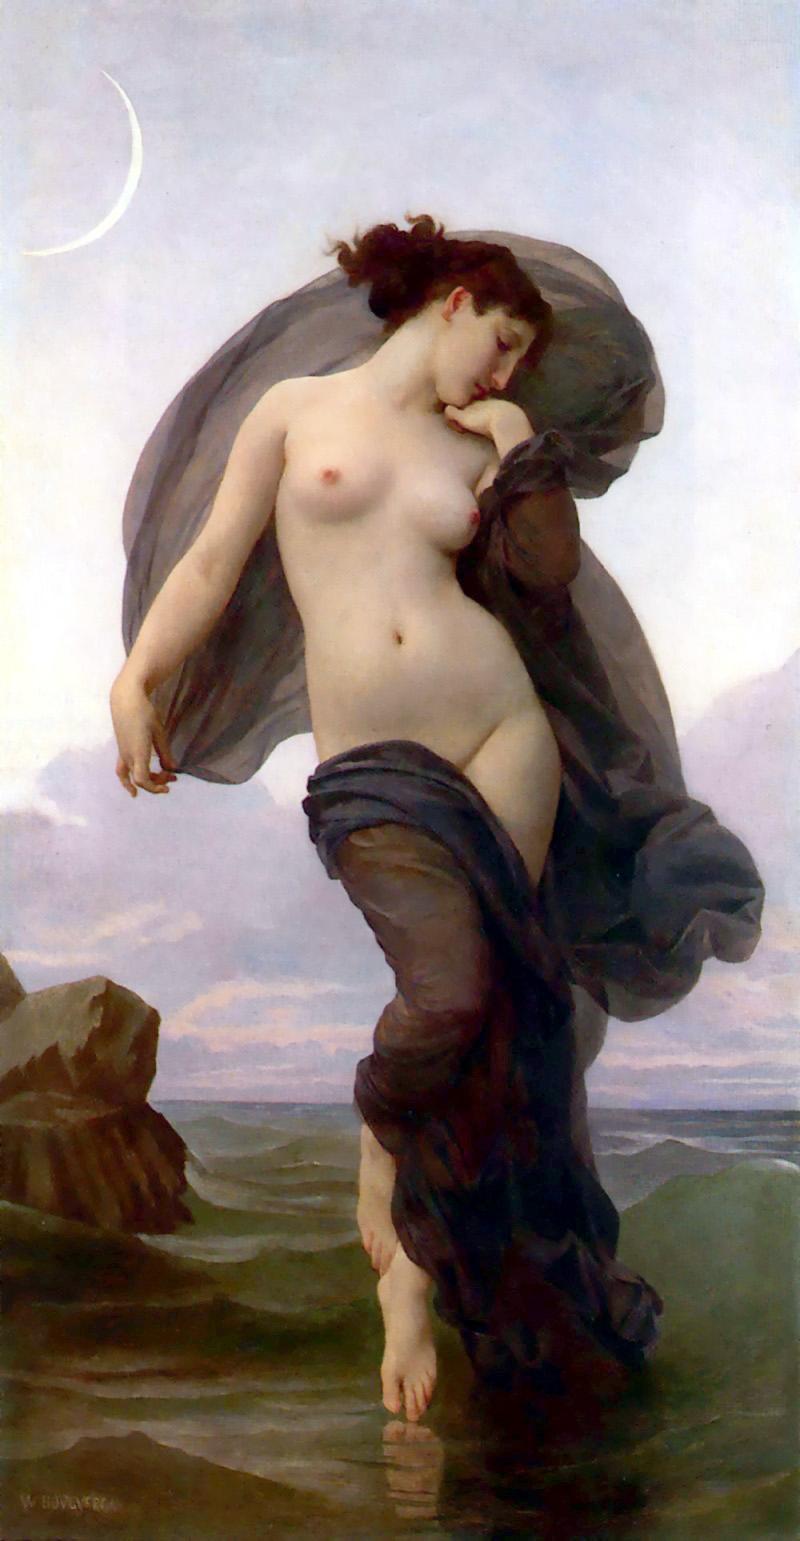
Le Crepuscule, by William Adolphe Bouguerau
The light in this painting is very diffuse, but you can still make out the predominant source of light in the upper left, though fill light in this case comes from all around. This kind of lighting would be best achieved through some kind of GI setup. Renderers like vray or lux render can do this kind of thing easily, but it can also be done in blender internal by getting rid of the fill and back lights, instead environment lighting to provide illumination for the shadows. A full discussion of how to set this up would be a tutorial of its own, so apart from the settings below I will leave you to experiment with this yourself.
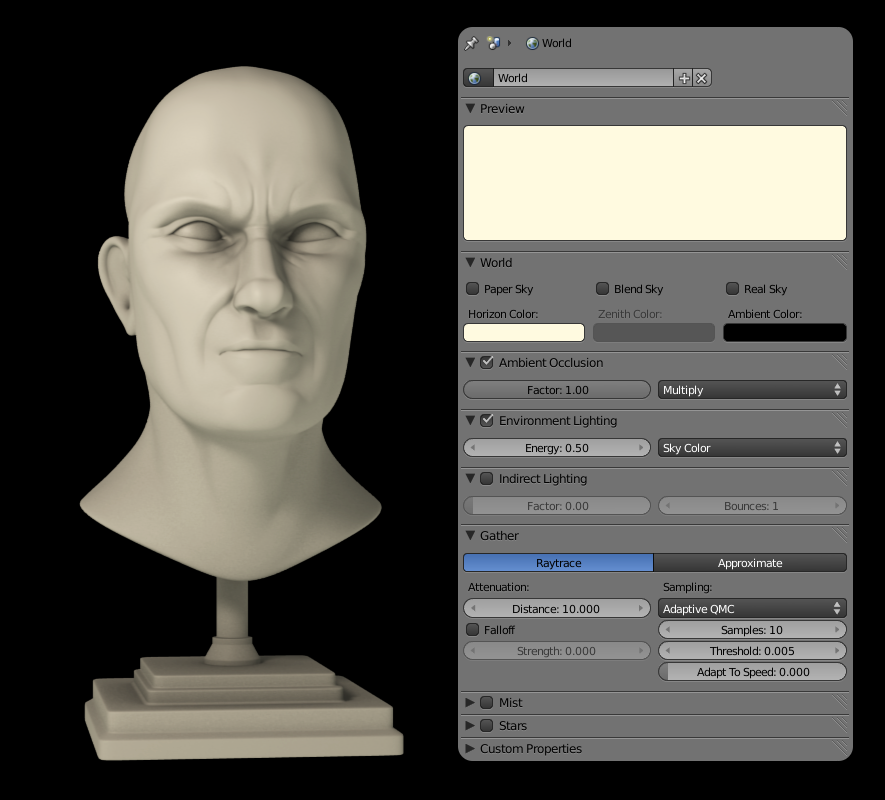
In this render, the subject is lit with only one key light, using environment lighting instead of fill and back lights to provide illumination of the shadowed areas. This results in very smooth lighting.
Tips:
Anyway. I hope this tutorial has been interesting and useful, and I leave you with a few general tips on lighting with spot and area lamps.
- Area lamps provide much stronger illumination than the other types of lamp with the default settings. Turn down the distance setting on the lamp to reduce its brightness before adjusting it’s energy, set it to a somewhat less than the distance between the lamp and the subject itself as a good starting point - use the line from the lamp in the viewport as a guide.
- Area lamps also take a long time to get nice raytraced shadows, particularly with high enough settings to avoid significant noise. For this reason they aren’t particularly suited to animation. That said with the speed improvements to raytracing in blender 2.5, they are becoming more of a viable option.
- If your spot lamp shadows appear pixelated there are a number of options. Increase the sample buffer size (try doubling it each time until you get nicer results) and set the filter type to gauss for smoother results. For better soft shadows you will also need to increase the number of samples taken.
- If you are going to add ambient occlusion to your three point setup, set it to multiply. Otherwise you’ll just have another light source to deal with when trying to adjust your lighting. Additionally, ambient occlusion is not the same thing as global illumination, and shouldn’t really be used as a substitute, as the name suggests (occlusion means blocking something, in this case light) AO should be used to remove light from the scene, not add it.
- When setting up your lighting, try creating a matte material (just a plain diffuse colour, for example a dull clay colour with no specular reflections) and setting it as the override material in the layers panel of the render setttings editor. This will allow you to look at the lighting in isolation from the other elements of the scene, which is a great way to troubleshoot lighting setups that aren’t quite working.
Blendfile:
If you missed it at the beginning, you can download it here.
Comments
francoisgfx (Jun 03, 2010)
you are nailing it man !! great job
bensimonds (Jun 03, 2010)
Thanks!
mofx (Jun 04, 2010)
Great stuff, thanks for sharing with the community too. Top notch stuff.
thisroomthatikeep (Jun 03, 2010)
Another great article, thanks for sharing all this info! :)
Reyn (Jun 04, 2010)
Ben, you did it again! This is very valuable information. Thanks for sharing it. ^_^
Heho (Jun 06, 2010)
Nice Tutorial, learnt a lot. But i’ve got a question: When I have a dark lighting setup there are often some strange lighting artifacts visible. They don’t really fade from light to dark but they look like “steps”(I’m sorry that i can’t describe it better… English is not my native tangue). This can’t be a buffer problem cause it is also there when I only use Raytracing… You can see what I mean here: http://upload.wikimedia.org/wikibooks/de/c/ca/Blender3D_li_inv_square.jpg look at the light on the floor… It’s like there aren’t enough RGB colors to create a smoothe gradient…
So how I get rid of this? One possible way is to activate dither but this let the picture look like a bad jpeg…
bensimonds (Jun 06, 2010)
Hmm. A certain amount of banding is inevitable, especially if you’re going to save in an 8-bit format. I’m afraid I can’t really see what’s going on in that image - it’s rather dark, and being a jpeg I cant tell whether any artefact is compression or something from blender. It looks reasonably smooth to me though.
bensimonds (Jun 06, 2010)
Just a thought, are you compositing in GIMP or doing a composite with an image saved in an 8 bit format? If so it could be that - always save to a 16bit or better format if you’re going to be doing any kind of levels adjustment to an image (which gimp won’t open…. that’s another issue though).
Blender lighting primer « :: m y C L O N E :: (Jun 06, 2010)
[…] Freebies, Lighting, Tutorials by Borrowind — Leave a comment 6 June 2010 A very useful new lighting primer/tutorial for Blender by the UK’s Ben Simonds. He also gives some tips on how to mimic the lighting from “old […]
Heho (Jun 06, 2010)
I thought that this has no influence on the render itself… Anyway: Which formats should I choose? And why are those bandings even in the default render visible?
BTW: I always composite in Blender.
Heho (Jun 06, 2010)
I just noticed(when I looked closer at the picture) that the bandings are really just the nearest colors(that means: band one R:0.111 G:0.111 B:0.111 band two R:0.112 G:0.112 B: 0.112 you get it) But this should not be noticeable for the human eye…
bensimonds (Jun 06, 2010)
I really can’t see much banding on the image you posted. Are you sure your monitors brightness and contrast are set correctly? This could well be the issue.
Oscar Baechler (Jun 05, 2010)
ZOMG I love you for Bouguereau examples. Best painter people have never heard of!
bensimonds (Jun 05, 2010)
Absolutely. Bouguerau was the master - probably my favourite painter, although that’s probably a three way tie between him, Leighton and Ingres.
Saurav (Feb 24, 2011)
Thanks Man and You Rock the Blender.
Tips para Iluminación de personajes en 3d (Jan 20, 2011)
[…] el tipo de proyecto en el cual estemos trabajando. Es por ello que Ben Simonds a publicado un tutorial en donde comparte algunos tips para iluminación de personajes en 3d, aunque habla de luces de […]
A look at lighting and a new lighting setup add-on « ThruDreamsgate's Blog (Jan 15, 2011)
[…] via Lighting tips from the Masters « BenSimonds.com. […]
eddybigz (Nov 19, 2010)
This has been very helpful. men thanks a lot looking forward to next tutorials
Rajith Eruveettil (Nov 22, 2010)
Amazing software.
Hperigo (Jun 15, 2010)
you might enjoy this videos:
http://www.youtube.com/watch?v=1oYgTP0MX2U
bensimonds (Jun 15, 2010)
Thanks for that!
Iluminação de estúdio com Blender Internal « Victor Phellipe (Dec 16, 2010)
[…] Desculpe! Enfim, para complementar, indico um tutorial aqui muito bom sobre iluminação: http://bensimonds.com/2010/06/03/lighting-tips-from-the-masters/. Está em inglês, mas prometo depois fazer a tradução e postar aqui no […]
Pascal Montjovent (Feb 17, 2011)
Thanks for this post. I’m a cinematographer and interested in the “virtual lighting” transpositions from what I use in the real world.
My blog could be of use (via Google translate) for those of you interested in real cinematography.
I found some mistakes in the post, none of them too dramatic ;-) but the Casablanca actor Conrad Veidt is not backlit from the left, but from the right.
Ben Simonds (Feb 17, 2011)
Thanks Pascal. I took a quick look at your blog, it’s really interesting, I’ll definitely have to have a proper read through sometime.
Rodrigo Couto (Dec 21, 2010)
Sorry, but im sure that the two images showing spot and area lights examples are inverted. Just look with attention to the sharp shadows in the base of the statue. Thanks for contribution, very usefull post!
existentia (Mar 05, 2011)
Brilliant! You make it seem so simple, and gave me the necessary background to experiment and learn. Thanks.
john leigh London UK (Feb 17, 2011)
very nice info and detail - really helpful to see a walkthrough of points to help consolidate lighting our skills - thanks for putting this together!
laabo (Sep 09, 2010)
Great article! Thanks for that!
zahlenzerkleinerer » Blog Archive » Tips für Licht in Blender 3D (Sep 09, 2010)
[…] das von den Meistern. Sehr gute Tips um die 3D Scene mit Lichtquellen zu versehen. Die Webseite und das blend File zum selber Lernen. Verwandte […]
How to Create Realistic Outdoor Lighting | Blender Lighting | Blender Guru (Apr 12, 2011)
[…] The Master Lighting Guide for Blender […]
HenruAlonso Abella (Apr 10, 2011)
Is very interesting.Yhank you.
Jazz (Mar 12, 2011)
Hi!! I just finished reading through this tutorial, and it revived my interest in learning more about lighting! I’m more of a 2D artist, but I like to dabble in Blender a lot, and I’m still such a beginner with 3D modelling and animation.
Lighting is one of my favourite subjects, so you really kept things interesting with this tutorial! Thank you!
mohsen (Apr 18, 2011)
Thanks for sharing,keep going…
Pierre Béliveau (Mar 15, 2011)
His name is not Bourguerau or Bouguerau…but Bouguereau…
Ben Simonds (Mar 15, 2011)
So many vowels… Sorry for my crappy spelling of French names.
Ade (Aug 23, 2011)
Really great post. You’ve somehow managed to make a lighting tutorial which isn’t overly complicated, using the busts and reference paintings really makes sense. Works really well as a general lighting tutorial. Cheers
Learning Lighting | Corner 3d (Aug 13, 2011)
[…] tutorial is here: http://bensimonds.com/2010/06/03/lighting-tips-from-the-masters/ GA_googleAddAttr("AdOpt", "1"); GA_googleAddAttr("Origin", "other"); GA_googleAddAttr("theme_bg", […]
Blender Mesh » Blog Archive » 7 Tutorials that helped me learn Blender (Sep 19, 2011)
[…] Lighting tips from the Masters […]
Sakari (Oct 08, 2011)
One of the best lighting article what I have read! Thanks mate…
aaron (Oct 17, 2011)
that was cool, does it cover this in the blender tutorial book “lightening and rendering in blender 2.5” like more techniques how to do it
Ben Simonds (Oct 17, 2011)
I don’t know. The book is nothing to do with me.
40+ Highly Useful but Rarely Collected Blender’s Tutorials | Dzineblog360 (Dec 04, 2011)
[…] Lighting tips from the Masters […]
Przydatne linki « Polski Kurs Blendera (Feb 27, 2012)
[…] Doskonały artykuł (j. ang.) na temat oświetlenia sceny w Blenderze […]
ndundupan (Jul 17, 2012)
Thank for share the tips, it will be help our community animation project
Ian Clegg (Jul 19, 2013)
Hello Ben,
First I must point out I’m new to 3D rendering & animation. Just read your tutorial and found it very informative and easy to understand. However, would you use a three point lighting setup for a dynamic outdoor animation (Would you have to constrain lights to model?) or is it only used for static images?
olivier (Nov 20, 2012)
Thanks a lot, very interesting…
Przydatne linki | Polski Kurs Blendera (Mar 12, 2013)
[…] Doskonały artykuł (j. ang.) na temat oświetlenia sceny w Blenderze […]
Ben Simonds (Aug 05, 2013)
You could light an outdoor scene this way, particularly if you were focussing on a single model or character within the scene - you could apply some basic lighting to the main areas of the scene in one render pass and light the main subject with a three point setup in another.
However for simplicity I’d suggest going for a GI setup with a sun lamp for outdoor lighting, it’s easier to make things look physically correct this way.
FCDIF (Jun 07, 2013)
A nice thing it’s very cool. Thank…
Robert Cunningham (Apr 21, 2013)
The artifacts look like an optical illusion. Your mind makes the banding because of the objects. You project the lines automatically. Look at the picture from a different angle and they disappear.
Художествено осветление | Визио (May 08, 2013)
[…] http://bensimonds.com/2010/06/03/lighting-tips-from-the-masters/ […]
Ways of Seeing – The Design | Jaclyn Lake Development and Research (Feb 17, 2014)
[…] http://bensimonds.com/2010/06/03/lighting-tips-from-the-masters/ […]
How to set up and use Nox renderer for Blender | quaint (Aug 31, 2014)
[…] as our fill, rim and key light. I definitely recommend you to check out this Wikipedia article and this blog post written by Ben […]
Reducing the size of shadows | CL-UAT (Dec 25, 2014)
[…] The trick really is to add more lights, but make them weak so as not to saturate the scene. If you are serious about lighting I recommend you read this classic post by Ben Simonds about lighting techniques. […]
Week 3 – Lighting, Rendering and Compositing | Andrew Moore (Mar 11, 2015)
[…] http://bensimonds.com/2010/06/03/lighting-tips-from-the-masters/ […]
Douglas E Knapp (Apr 26, 2016)
Which Leighton?
Johnyer (Aug 26, 2016)
Findings Jobs On Craigslist - The Right Way To Search With Success
http://go.1o3.me/dcDjC - wages and benefits
Blender Lighting Tutorial for Beginners (Oct 21, 2015)
[…] to give it that nice silhouette look. Explaining this in detail would be a tutorial on its own. Click here to learn from the […]
Harshavardhan (May 21, 2015)
Very informative! Thanks For Sharing!!
Lighting | jaydenossiterghostart (Mar 13, 2015)
[…] tips from the Masters. (2010, June 3). Retrieved March 13, 2015, from http://bensimonds.com/2010/06/03/lighting-tips-from-the-masters/ Slick, J. (n.d.). Standard 3D Lighting Techniques in Maya and 3DS Max. Retrieved March 13, 2015, […]
Blender: С чего начать - Exploring Blender (Oct 22, 2014)
[…] Lighting tips from the Masters — не новая, но вечноактуальная статья об основных принципах освещения в Blender. Общие закономерности и примеры, но без технических подробностей. […]
FLUOTEC (Jul 19, 2015)
Reblogged this on FLUOTEC.
Lighting tips from the Masters | videoworld studios (Jul 26, 2015)
[…] Sourced through Scoop.it from: bensimonds.com […]
Week 3 | wardredplease (Mar 02, 2016)
[…] Ben simonds, B.S. (2010). BenSimondscom. Retrieved 1 March, 2016, from http://bensimonds.com/2010/06/03/lighting-tips-from-the-masters/ […]
Maria (Oct 10, 2015)
Thank you for sharing..What ! Grea article.. Very informative and useful aswell..
http://www.gameyan.com/character-shading-lighting.html
Trent (Jun 27, 2017)
sdhgvewshtg ker
Rendering and Lighting | 3d art and animation (May 07, 2016)
[…] LIGHTING TIPS FROM THE MASTERS […]
ricardoroehe (Jul 19, 2017)
New link for the same file: https://www.blendswap.com/blends/view/3836
Abhimanyu (Jul 10, 2018)
Great post. Holds up even today. Thanks.
RonaZep (Apr 21, 2017)
заработок в интернете через вконтакте Vacuum заработок в интернете заработок в интернете платные задания
area lamps, back light, blender, blender 3d, cinematography, fill light, hollywood lighting, key light, lighting, lights, portrait, portrait lighting, rembrandt lighting, rim light, spot lamps, three point, three point lighting, tutorials — Jun 3, 2010