
Physics and Creating Plausible Materials.
Something that is really handy to bear in mind when creating a material, is how it would interact with light in the real world. Even if you aren’t interested in creating photo realistic renders, it’s likely that you still want to be able to create materials like wood, metal, glass etc, and a vital part of knowing how to do this is knowing how real world materials interact with light. Thankfully this is simply a matter of knowing some basic physics, and being able to apply this knowledge to blenders material editor. The following are a few rules from the real world about how light works, and how this applies to CG.
Diffuse vs Specular Reflection When light hits any flat surface it reflects back at the same angle:
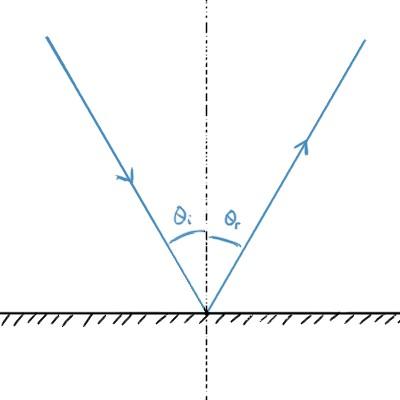
This is called specular reflection, and gives rise to the focussed, bright reflections we see on shiny surfaces (as well as mirror reflection, as I will discuss in a bit). On a microscopic scale though, most surfaces are actually very rough, causing the light to be scattered off at all angles:

This is called diffuse reflection. The light gets spread out by the surface and goes off in all directions, giving it a flat, matte look. Many materials exhibit varying levels of both these kinds of reflection, giving rise to a broad, diffuse illumination of the surface, along with a smaller, brighter specular highlight, like so:

In other words, something like a standard blender material. Varying the amounts of these kinds of reflection allows one to mimic a wide variety of material types relatively easily, increasing the specularity for shiny objects like plastic and metal, or decreasing it for matte objects like paper or coarse stone. However, to keep materials physically accurate, there are constraints on how much these parameters can be varied.
Conservation of Energy Edit: I’ve edited this bit quite heavily, as Matt Ebb made some great points in the comments.
Objects look brighter or darker because of the amount of light they reflect. The light they don’t reflect either as a diffuse or specular reflection is absorbed by the surface as heat, and so the total amount of energy hitting the surface is conserved. Blenders internal renderer, being a non-physically correct renderer does not conserve energy, but you can still bear the concept in mind whilst creating materials. In general the specular and diffuse components of a material shader should not both be set to the maximum, as this would suggest that the material was reflecting 100% of the light it received as diffuse light, and then another 100% as specular reflection! Clearly impossible. Instead, if your material reflects a lot of diffuse light, it should probably have a lower specular value, if it is very shiny and has a high specular intensity, then it’s diffuse reflection should probably be low.
Left: A sphere with a high diffuse intensity, and low specular intensity. Right: High specular intensity, low diffuse. Middle: Maximum diffuse AND specular intensity. Note how it looks blown out and too bright for the scene.
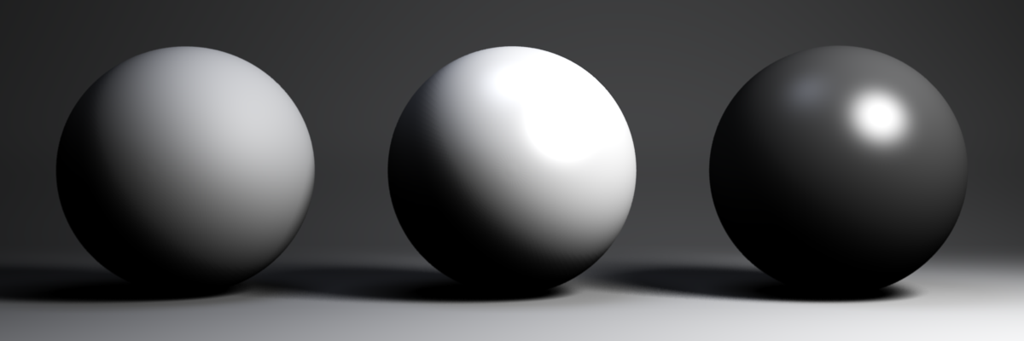
In the example above, the specular and diffuse components of the middle sphere are both set right at the maximum, and as a result the material looks too bright. This might not be too noticeable in a simple scene, but in a more complex project things can soon start to look off if you create materials without any regard for keeping them physically plausible.
Specular vs mirror reflections
So we have established that diffuse and specular reflections are part of a single whole, which cannot be more (at least in reality) than the total amount of incident light. However, what about mirror reflections? Well, in reality, there is no difference between specular and mirror reflections, and in physics (as well as many physically correct renderers) the terms are used interchangeably (see the wikipedia article on specular reflection for example). However, when taking about specular reflections in terms of blenders materials, we are talking about an approximation of the way that objects reflect light, that takes into account only the light coming directly from the light source. __ In many situations, and for many materials, the only light strong enough to create a glossy specular reflection is that which is coming directly from the light source itself, and so this approximation works well for mimicking a basic shiny surface (as in the examples above). But a highly polished, mirror like surface can reflect the light coming from everything in its surroundings, and so we need to enable ray traced mirror reflections to enable this. To keep our material looking correct then, we need to realise that specular and mirror reflections are two sides of the same coin, specular reflections coming from the light itself, and mirror reflections coming from light reflecting off the surroundings.
On this sphere, the surroundings are reflected by ray-traced mirror reflections, whilst the reflection of the lamp (on the upper right of the sphere) comes as before from the specular shader.
Hardness
Hardness for specular highlights determines how focussed and “hot” the specular highlight is. This tells us visually how smooth and polished the surface is. Polished chrome for example has very tight, hot, highlights (very high hardness). Dull brass might have more spread out highlights (lower hardness). Bear in mind that because the hardness of the surface is indicative of its smoothness, a surface with very high hardness should also have stronger specularity (and less diffuse reflection) in general, whereas a rougher surface should have lower specularity (and more diffuse reflection). Also if your surface is smooth enough to have clear ray-traced mirror reflections, it probably should have a very high hardness too.
Two spheres, one with a low hardness and lower specularity, the other with a high hardness, higher specularity and mirror reflection enabled.
Specular Colour
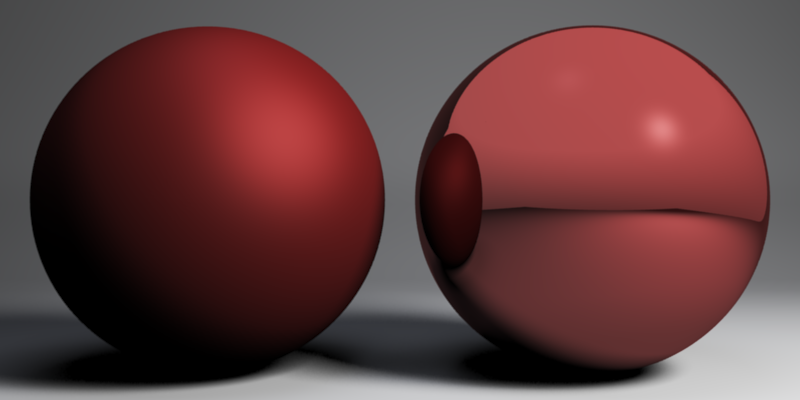
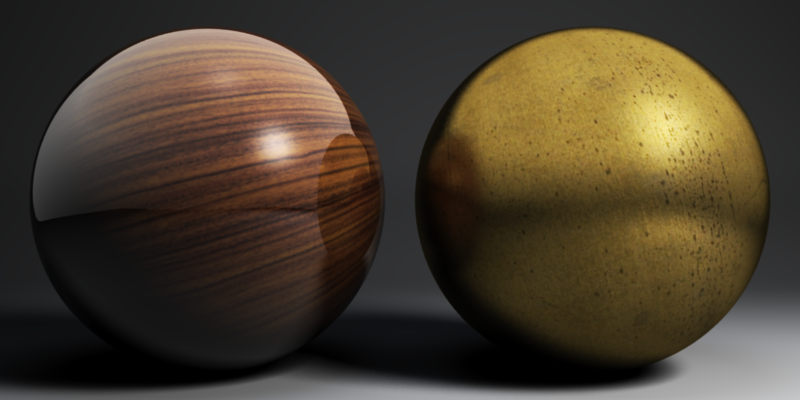
The colour of specular and mirror reflections is dependent heavily on how they are generated, for conductive materials, i.e. metal, specular reflections take on the colour of the material. However non-conductive (dielectric) surfaces like plastic, skin, leaves or polished wood, the specular reflections do not take on the colour of the material. Here are a couple of examples:
For the polished wooden sphere on the left, the underlying colour of the material has no effect on the colour of the specular/mirror reflections. The metallic sphere on the right has more richly coloured reflections, as the diffuse texture was also used to affect the cmir and cspec channels.
Of course…
These are only guidelines, at the end of the day all that matters is that your renders look how you want them too. Keeping an idea of how a material would work in real life can help you achieve that though, and you can only break the rules to get the effect you want if you know what they are in the first place.
Further reading:
I’ve learned rather a lot as a result of corrections and questions people have sent me since I posted this, I’ve tried to edit the post to reflect this, but you can also check out some of my sources at the following locations:
Neil Blevins CG Education - Metals and Reflections
Blender Documentation - Specular Reflection
Blender.org forum - Blinn Specular
Comments
comeinandburn (Nov 27, 2010)
Thanks this was helpful. Although Blender’s materials aren’t physically accurate I’m always amazed at some of the really nice renders that are produced with it. I guess it’s just a matter of being familiar with how it responds.
great post!
GotemCZ (Nov 06, 2010)
Thank you for this helpful topic :)
bensimonds (Aug 28, 2010)
Thanks for your comment Matt. I’ve tried to edit the post to reflect what you pointed out. I was aware that (obviously) blender internal was non-physical, but I had always assumed that the material settings at least reflected the proportion of light that a material reflected, and thus conserved (or at least appeared to conserve) energy, thanks for setting me straight.
Reyn (Aug 29, 2010)
That was a mind-opener, Ben. Thanks for sharing your thoughts on this. I didn’t know that physically speaking the diffuse plus specular is less than or equal to 1. Thanks a bunch.
-Reyn
hperigo (Aug 29, 2010)
thanks for the answer!!
i got one more question:
A specular highligth strength (or size?) depends of a fresnel value?
bensimonds (Aug 29, 2010)
Specular strength should depend a Fresnel term, being stronger at lower viewing angles (as mirror reflections are with the Fresnel value turned up). However with basic Phong and Cook-Torrence specular, they do not. However (to my understanding at least) the blinn specular shader does take viewing angle into account, based on the IOR of the material, and is physical in at least as far as the specular strength varying with the viewing angle is concerned.
I managed to find a pretty good explanation here if your’e interested, it’s back from when the blinn specular model was first being implemented in blender, scroll down to cessen’s second post for a better explanation than I can manage.
hperigo (Aug 31, 2010)
ummm cool!
there is a nice tutorial on how to create a blacklight shader in maya:
http://www.creativecrash.com/maya/tutorials/rendering-lighting/shaders/c/backlight-shaderit basically is a blinn shader with the eccentricity value plug in to the “facing ratio” of a surface, gives a cool effect.
bye!
Matt (Aug 28, 2010)
Unfortunately using blender’s renderer to teach these concepts doesn’t work very well because blender’s renderer is completely non-physical, not just in the sense of realistic GI, but at the fundamental level of how its shading system works.
Eg.
- Blender’s materials don’t conserve energy - it’s easy to get them reflecting more light than is shining on them. They’re not normalised either, so the overall amount of light reflected is dependent on the surface roughness (which it shouldn’t!)
- So therefore, blender’s specular intensity sliders don’t really mean that much in the context of trying to get it to conserve energy.
- Having rough ‘specular highlights’ (which are really just cheap representations of reflections of point light sources from a partially glossy surface) on top of crisp mirrored reflections is impossible, as is the idea of an evenly blended ‘diffuse + mirror’ or ‘diffuse + spec’ material. In the real world similar combinations can occur due to layering, but usually they’re weighted with a fresnel term. eg. a varnished wooden table can look ‘diffuse’ when you look straight down on it since you’re looking at the rough/diffuse wood itself through the dielectric varnish, but then as you look at glancing angles it looks mirrored since the fresnel term of the varnished layer takes over and more strongly reflects light from the reflection vector. This also ensures conservation of energy since any light reflected by the top varnish layer doesn’t continue penetrating through to then be diffusely reflected off the wood layer a second time.
And so on..
Anyway, some of the things you raise there can at least help to get a somewhat more realistic result than if people left the materials to the default, but due to the (can I say crap?) way blender’s shading system works, some of the conclusions you draw about energy conservation at least are incorrect.
bensimonds (Aug 27, 2010)
In answer to your questions:
Not a trick. The position of specular highlights depends on the viewing angle because only those rays that hit the surface at the right angle get reflected towards the eye/camera (unlike diffuse reflection, where rays get reflected at all angles, and so can be seen from any angle).
The additions I talk about above are really just figurative, I just changed the material settings on the different spheres, one with just diffuse reflections, one with just specular, one with both. However, you could achieve the same thing either with material nodes or in the compositor, just be aware of how you have colour management set up as to what nodes you use, add if you are working in linear colour space, screen if you are working in sRGB.
hperigo (Aug 27, 2010)
great post man!
I just have two questions:Specular shaders (like phong) are dependent on a camera angle and diffuse shaders are´nt (like lambert shader) is that a trick? or it happens in real life?
and the reflection pass is added to the diffuse pass? because if you do that in post-production you get some weird results…. (at least i do =D)
Joel (Aug 27, 2010)
Thanks! This is a big help!
Energy Conservation | (Jan 21, 2015)
[…] Left: A sphere with a high diffuse intensity, and low specular intensity. Right: High specular intensity, low diffuse. Middle: Maximum diffuse AND specular intensity. Note how it looks blown out and too bright for the scene (1) […]
Julimar Araújo de Freitas (Sep 29, 2014)
Super!!!
Hamza (Dec 09, 2021)
Thanks, it helped me a lot for my thesis :3
blender, blender 2.5, diffuse, light, material, materials, reflection, rendering, shaders, specularity, textures, tutorials — Aug 27, 2010