
Quick Tips and Tools for Texturing With GIMP
GIMP may not have the technical bells and whistles of photoshop, but if you know your way around it, it still gets the job done. The following are a few of the tools and techniques I find most useful when working on textures in the GIMP.
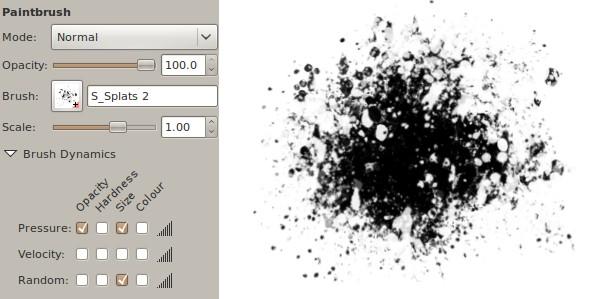
Transitions: When cloning and painting textures from multiple sources, using hard edged brushes is a good way to avoid pixel soup. The difficulty of course is that the boundaries between different texture sources can then be very obvious. A good solution is to pick a nice grungy/splattery looking brush and set the size to random (as well as any pressure settings you want if you’re using a tablet). This should give a nice fractal like pattern with reasonably hard edges, that is ideal for blending many kinds of textures, either with the clone brush or layer masks, I use it for all sorts of grungy stuff, as well as for painting skin.
A nice brush setup for cloning and painting alpha masks.
Click for full size . Transitioning between textures with this kind of brush gives nicer results than a smooth fade, maintaining the crispness of the textures throughout the transition. The black and white image on the right shows the alpha mask for blending between the layers.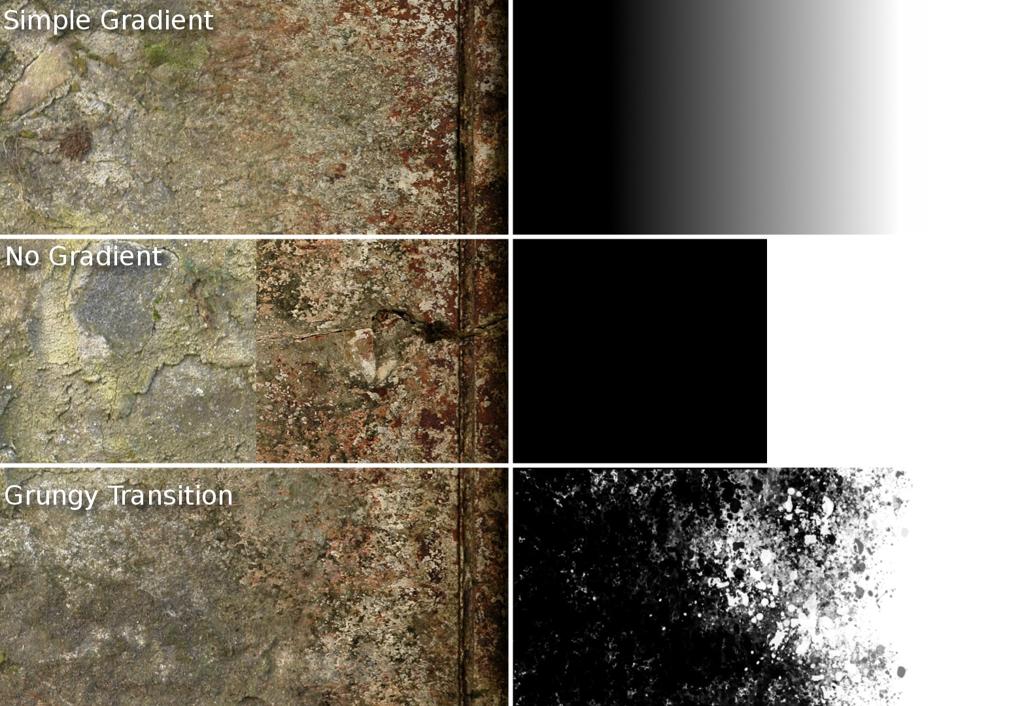
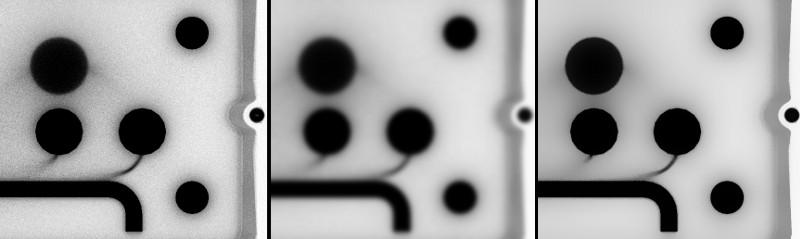
You can find theses kinds of brushes all over the place. I’ll include a few links to my favourites at the end though. **Selective Gaussian Blur:** Probably my favourite filter, I regularly use this tool when texturing in the gimp. When baking AO maps it can be tedious to set the quality way up and wait around to get smooth results. Much easier is to bake at medium quality and blur the results to get rid of the results. With a simple Gaussian blur though any sharp edges in your bake will also get blurred, which you don’t want. Selective gaussian blur gets around this by only blurring noise and slight differences, and maintaining sharp boundaries. Playing around with the settings will usually take your baked AO maps from noisy to nice and smooth in the press of a button. For best results do a small regular gaussian blur (say two or three pixels) first to smooth out the noise slightly, then run selective Gaussian blur to do the main work of smoothing out the texture.
Left: Original baked AO texture. Middle: Simple 15px gaussian blur. Right: 2pixel gaussian blur followed by a 15px selective gaussian blur. Sharp edges are preserved but the noise is gone.
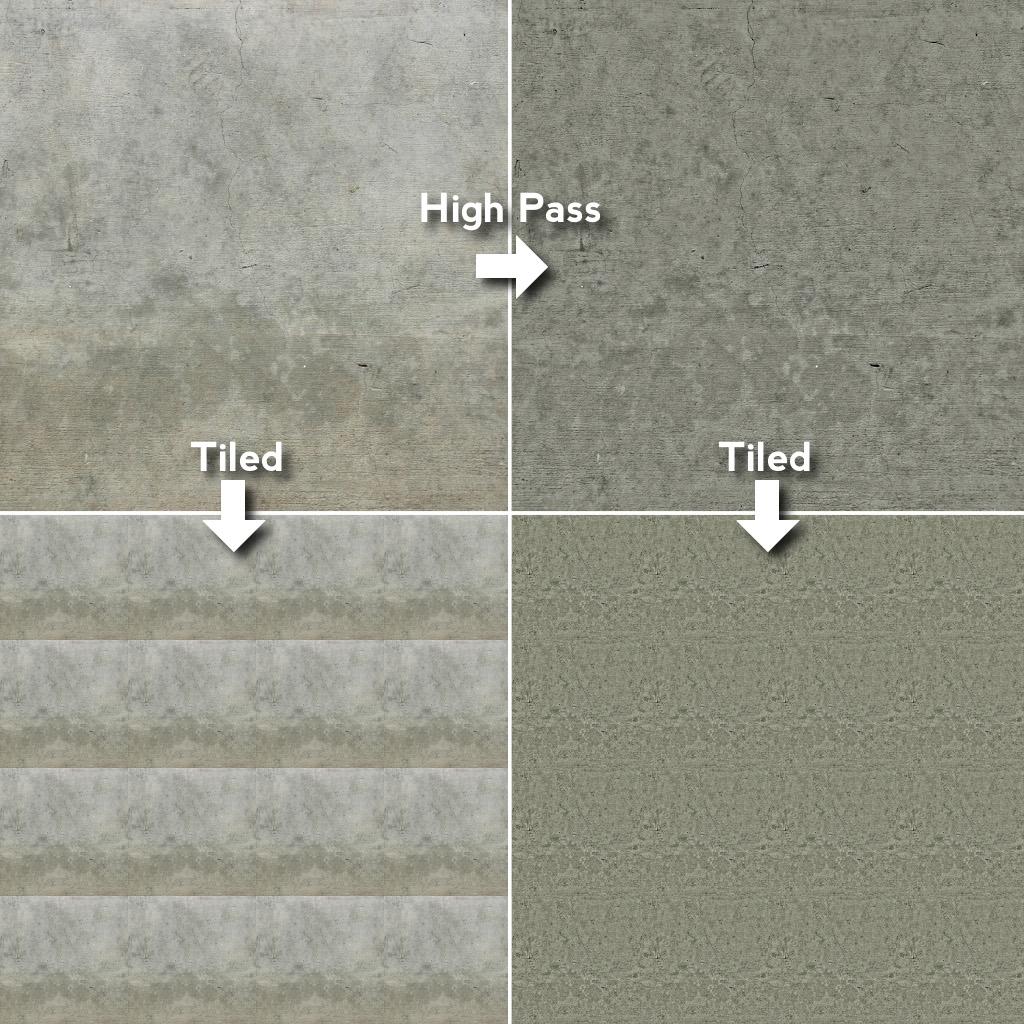
It’s also usefull for all sorts of other things, I often use it when working on bump or displacement maps to even out flat areas whilst keeping the sharper bumps. High Pass Filter: Another great filter for working on textures, it’s sort of the opposite of a blur. It pulls out the high frequency detail and gets rid of the large details. This is fantastically usefull when trying to create seamless textures. High passed images also make great overlay layers for adding detail to a texture or render.
The high pass filter removes the large features of your image, leaving only the details. This makes tiling your textures much easier. It can however remove a lot of the colour from a texture, and leave it feeling dull, so use it sparingly and think of ways to reintroduce that interest.
Some great GIMP resources:
So that’s a few tips that I find useful fairly often. Here’s some links for useful plugins, brushes for texturing:
- DeviantArt is a great resource for GIMP brushes. In general there’s a lot that aren’t much use, but a number of the grungy/splatter type brush sets can be really helpful in creating textures. Here are two sets that I find quite useful.
- Goro is a fantastic digital painter, who has a pack of Photoshop brushes on his site available for download. You can find them here, along with some great tutorials. GIMP will actually use Photoshop .abr brush files just like any other brush if you put them in your .gimp-2.6/brushes/ directory. Not everything carries over (GIMPS brush engine is unfortunately nowhere near as sophisticated as Photoshops), but they work ok and it’s a useful set.
- GIMP Paint Studio provides some fantastic brushes and other tools for making painting in gimp easier. The downloads section on the site also has some excellent extra brushes too. Check it out.
- If you’re using ubuntu, you can find some great add-ons for the GIMP in synaptic package manager. Look up gimp-data-extras, which has some useful brushes (including the grunge brush from earlier in this post) and filters, and gimp-normalmap, which generates great normal maps from image textures. I’m sure with a bit of googling you can find these online as well.
Questions? As usual, leave questions in the comments and I’ll do my best to answer.
Comments
Sean (Jun 08, 2010)
This is what we need more of! There are tons of repeated tutorials out there on “the blender side of things”, but very little info creating textures with gimp/photoshop etc. So often I see tutorials hit everything in detail except the actual creation of the textures. This is the part I’ve been hazy on for so long. I’d love to see more tips and tricks in this realm. Thanks Ben!
Sean (Jun 08, 2010)
For future texture tutorials I’d love to see:
- Painting human textures/soft surface textureing
- Hard surface texturing
- Hand painting textures from scratch (No photo textures)
- Tips and Tricks that are out of left field that I would not even know to think about.
Love the blog!
bensimonds (Jun 08, 2010)
Those are good suggestions. I may well cover them in future.
3sie3wiel (Jul 21, 2010)
I second that! This info is… what I’ve been looking for!!
Phil (Aug 06, 2010)
Yess! more texture tutorials!!!
Lois (May 17, 2011)
What a joy to find such clear thinking. Thanks for pontsig!
jpv2 (Jan 03, 2012)
Regarding transitions section: how exactly do you obtain that “Grungy Transition”? Do you start from hard black-white transition and paint on the edge with the grungy brush? In this case do you need special brush that paints in “both directions” (black-on white and white -on black)? My problem is that all brushes I found (on Deviant Arts etc.) are single color with transparency, so my transitions paint only with foreground color. Where to find suitable brushes? Or is there some special trick in Gimp that makes it possible to use standard single-color brush to paint both ways as you are showing in your “Grungy Transition” example?
jpv2 (Jan 04, 2012)
Ah, OK. Now I understand the concept.
Thanks
Regards
Ben Simonds (Jan 04, 2012)
I just do a bit of painting in both directions. Fist with the foreground colour set to white, then to black.
Danish (Mar 22, 2017)
Really good work,
ao map, blender, blur, brushes, filters, gaussian, gimp, gimp brushes, high-pass, selective gaussian blur, texture, textures, texturing, tutorial, tutorials — Jun 8, 2010