
Hair in Blender
Hair used to be something I really hated having to do in CG, and to this day you’ll see more than a fair share of baldies amongst my works. However with more and more updates to blenders hair tools, it ‘s getting easier (and even fun!) to create characters and creatures with hair. This tutorial/guide covers working with hair particles in blender, including particle systems, combing/cutting/styling hair, and using the child particle settings. Reference is Key As always, a big part of getting good results is knowing what you’re going for, and hair is no exception. Go out onto the internets (or if you’re feeling particularly adventurous, the real world) and look for examples of the kind of hairstyle you want your character to have. Pay attention to how this reflects on your characters personality too, your stereotypical space marine isn’t likely to have long, elegantly coiffured hair, and that beautiful princess is going to look odd with a birds nest perched atop her head. How styled or messy your characters hair is reflects who they are, so it’s worth spending a little time thinking how it should look and searching for examples. Collect up some reference images and have them on hand to refer to when doing your characters hair. Once that’s sorted, you can start thinking about how you’re going to make that hairstyle in blender. [caption id=”attachment_936” align=”aligncenter” width=”393”
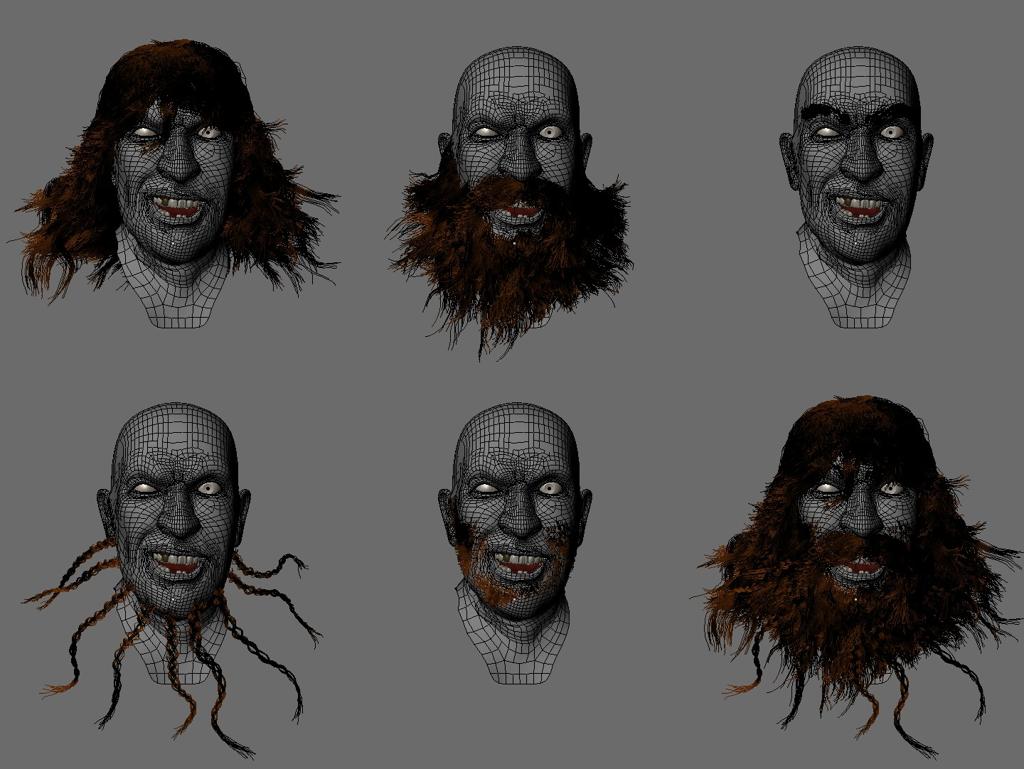
Bad Hair Day? Know what you’re going for first.
Break it Down, Build it Up
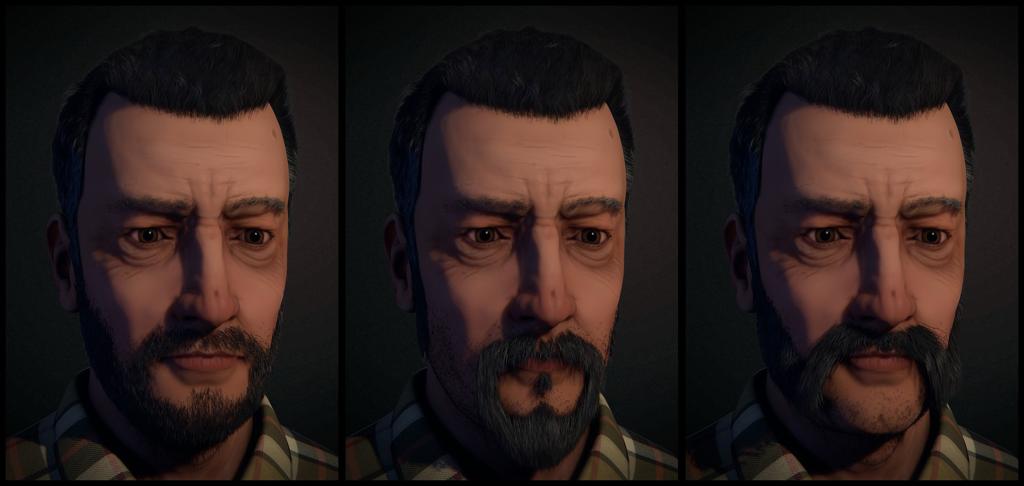
An easy mistake in trying to do a complex haircut is trying to do it all in one go is trying to build it all in one go. Not only will this put more strain on your poor old computer, it’s going to be a nightmare to control too. Instead, break each part of the hair down into different particle systems that you can work on and tweak separately. You can assign the same material to each at first, and later make unique materials for certain parts, say if you want to add a few grey hairs to a beard, or make some of the hair thicker to look like stubble or eyebrows. If you want to do simulations with your hair system, you might want to keep the number of hair systems low to give yourself less work later on when doing simulations, but for still images you can go to town with lots of separate particle systems for maximum tweakability.
The five separate particle systems for my pirate captain character. The combined effect is on the bottom right.
Now, I should mention that in blender 2.56 and upwards, there are some great new hair features, such as the parting controls, that give you more control over separating areas of hair within the same particle system. You can get some more details on them here in a previous post I wrote). Particularly for animation if you’re doing some kind of simulation, theses are good alternatives to using separate particle systems, but I still think particularly for still renders, separate parts are the way to go.
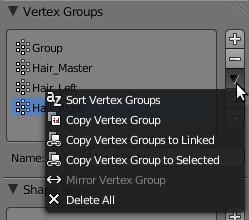
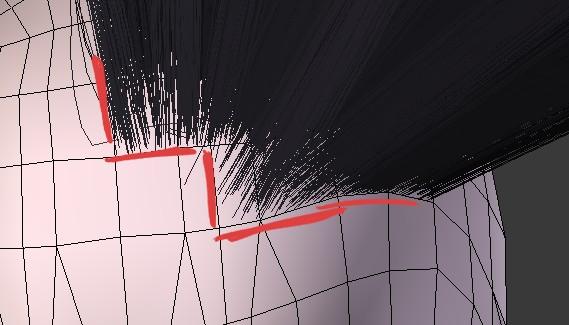
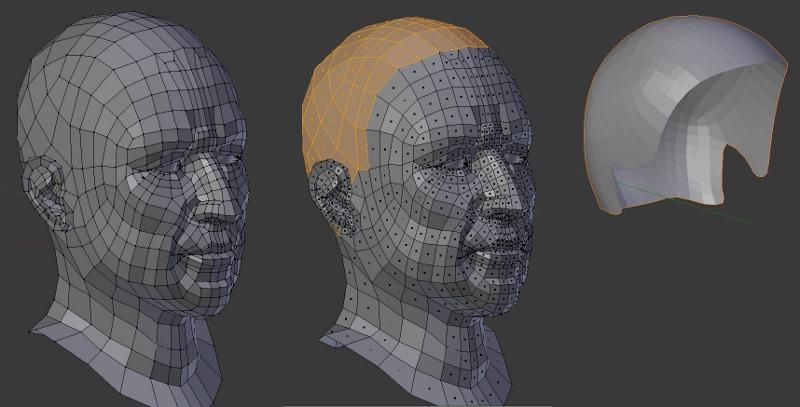
Start by creating an overall vertex group in weight paint mode of where you want your hair to be. Select your mesh and press Ctrl-Tab to do this by default, then start painting areas on your mesh where you want hair to be. You can use the x-mirror option in the tool options sidebar to keep the vertex group symmetrical if your model has symmetry, which is handy for most characters, as hairlines are usually broadly symmetrical. Once you have a good overall map, go over to the properties panel and look in the mesh settings sub panel under vertex groups. Click the little drop down menu and select copy vertex group to create another copy of your master hair density group you’ve just created, and give it a nice descriptive name for the first part of your hair system you want to create.
Then start trimming this vertex group with the subtract brush (open up the tools sidebar in the 3D viewport by pressing “T” to see the brush options), to create a smaller vertex group that only covers the area you want the first part of your hairstyle to cover. For example, if you were doing a haircut with a side parting , then remove all the vertices on one side of the parting, if you were creating a character with a moustache, then restrict your vertex group to just cover the upper lip. By subtracting vertices this way you can maintain nice neat vertex groups, and if you used symmetry to create your master group, then the symmetry of the hairline and so forth will be conserved. You can always add to the vertex group too, to fix any mistakes. You can also jump into edit mode and add or remove any hard to reach vertices by hand.

Vertex Groups for different hair particle systems laid out. The main (top left) hair group could be further broken down to give a parting or sideburns.
Once you have your vertex groups you can start creating particle systems for each.
Hair System Basics
Open up the particle settings panel with your mesh selected, and add a new particle system and set it’s type to hair. Under the emissions settings, you can then define the number of particles you want to use (see the section on child particle setting for some advice in this regard) and some distribution options. For nice evenly distributed hair, make sure the “random” and “even distribution” check-boxes are ticked (note: these settings currently appear under advanced in the most recent 2.56 builds, in older builds they are always visible).
Under the velocity settings, all you really need to do is set the “normal” velocity option high enough to give you long enough hair for your purposes, as anything else we adjust will just get superseded by any editing we do later in particle mode. Skip most of the subsequent settings for now, and jump down to the vertex groups sub-panel. Here you can use the density option to select one of the vertex groups you made, and restrict the hair growth to the area you want to work on first. You can also use the other various groups to change how you hair system looks. The length option is particularly usefull, as you can create another vertex group from your master density group, and use the multiply/subtract brushes in weight paint mode to create areas of shorter hair growth leaving the areas you wish to be longest untouched, then use this vertex group on each hair particle system to control the hair length.
Comb, Cut, Style
Okay, so I’m a dude, and if you could see my hair today you probably wouldn’t believe I was in any position to comment on such matters. But in general, if you pay attention next time you get a haircut, the hairdresser will comb it first, then cut it to the right length, then do any other stuff that needs doing. This makes sense, as there isn’t much point changing the length of the hair, if you don’t yet know how it’s going to sit. Start by creating a hair partcicle system with reasonably long hair, then go into particle edit mode and start by combing it to roughly the right shape for your final haircut. You can use the length tool to increase the length of any strands that aren’t long enough, but don’t worry about any that are longer then you need. Then begin cutting the hair to the length you want. Of course in blender you have the advantage that you can always take make hair longer as well as cutting it away! After it’s the right length, you can add some more interest. Start using the comb tool again with a low intensity to add some waviness to the hair for example, or use the puff tool to add volume.
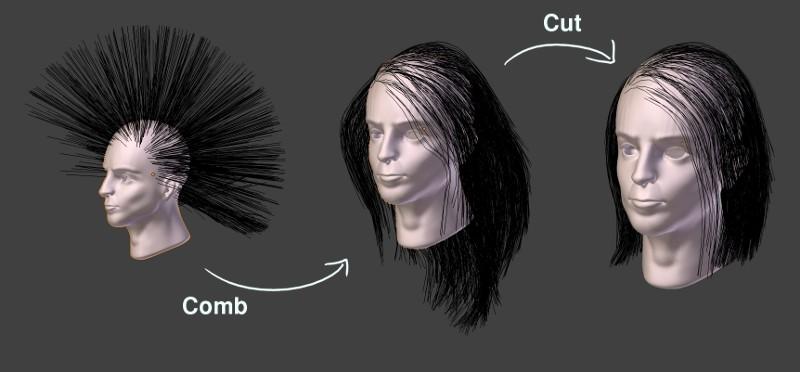
Your basic bowl cut. Comb it down, then cut it to the right length. This provides a good base to start working from.
Once you’ve done this for one part of your hairstyle, just keep repeating the process with all the different parts to complete your characters hair.
Children Are the Future
Wow, I really can’t resist a cheesy sub heading title can I? Anyway, unless youve got some monstrous supercomputer capable of editing several hundred thousand hair particles (not to mention the patience required to do so) you’ll be wanting to use particle children to fill out your hair cut from a sparse scattering of lonely looking hairs to a nice full looking mane. To do this you’ll want to use child particles to fill in the gaps, and there are two ways blender lets you approach this, simple children, and interpolated children.
Edit: Someone pointed out to me that they couldn’t find the simple and interpolated options. In older builds, the options for child particle types were “particles” and “faces” respectively instead. They worked the same way though, just different names.
Simple child particles will follow the path of the parent particle pretty much exactly, and are not really attached to the surface of the mesh, instead they just stem from an area defined by the radius setting, around the parent. This gives them a kind of patchy look unless you use a lot of parent particles, which presents its own problems. Also, because they are located only around the the parent particles, they ignore vertex groups. This can be useful sometimes, for example you can add some extra parent particles along the hairline of your character to give more children there, placing the parents by hand with the add tool to give a nice tidy boundary which the child particles will obey. On the other hand if you have nice high-res mesh with well defined vertex groups, this may be the opposite of what you want.
Exaggerated patchiness caused by not setting the child radius high enough with simple child particles.
Interpolated child particles blend between the different parent hairs, and stay on the surface of your mesh, on the areas defined by by your vertex groups. Because they don’t crowd around the parent particles, and don’t follow their paths exactly, they don’t have the patchy look of simple children. They also have the advantage that you can use far fewer parent hairs to define the hair-style, and use lots of children to fill in the gaps more cleanly. In general, I find I can get away with only a couple of hundred parent particles using this method, compared to several hundred or even thousands of parents when using simple children (to combat the patchiness and get nice boundaries). However they have the disadvantage that because they stick to the boundaries set out by your vertex groups, then if you have a very low resolution mesh, then the borders of your vertex groups will follow the topology of your mesh, potentially resulting in very un-natural looking, jaggy boundaries and hairlines. To combat this you simply have to use a higher resolution mesh when painting your vertex groups to get nice clean boundaries. This is easy for still images (just apply your subdivision modifiers before painting your vertex groups), but problematic if you want to keep your mesh un-subdivided to give nice deformations for animation. Thankfully with future updates to blender, we should be able to use textures of any arbitrary resolution, rather than vertex groups to define hair density, which ought to solve this problem.
With interpolated child particles, the hairline will follow along with the topology of your mesh.
In general, if you can get around the problems I mention above, then I advise using interpolated particles. They look nicer with much less effort, and you can use far fewer parent particles, which makes editing easier and reduces the amount of memory it takes to load your scene. With that done we can move onto the other child particle settings. I’ll cover each in order:
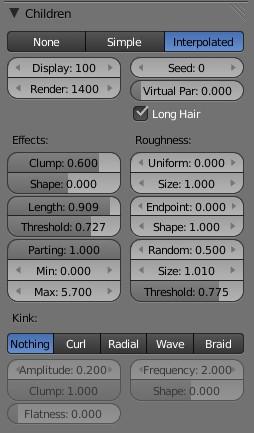
- Display and Render: How many child particles to generate in the 3d display and at render time respectively. To get the total number of particles, multiply this by the number of particles in the emission settings. I generally aim to have a few hundred thousand to no more than a million hairs in total, as having more can take prohibitively long to render. So if I’m using interpolated particles and I have a couple of hundred parent particles, then I’ll set the render amount to a couple of thousand. Set the display amount much lower, to whatever keeps your viewport running nice and snappy whilst still giving you a good idea of what the final render will look like.
- Seed: This just changes the pseudo-random seed used to generate the child particles. Handy if there’s just a few hairs out of place messing up your hair-do, just change it and see what you get.
- Virtual Parents (Interpolated Only): If you have a low number of parent particles, then the clump and kink settings can start to look a little messed up when you start adjusting them, as the child particles will start forming into really big clumps and curls etc. To fix this, turning up the virtual particles will generate more “virtual” parent particles for the child particles to clump around, giving a nicer distribution to any affects you add to the hair.
- Long Hair (Interpolated Only): Turning this on makes the ends of hair particles line up more neatly. See this post by the developer for more information.
- Clump: Just what it says on the tin. It makes the particles clump together more towards the end. Good for messy/greasy/spiky looking hair as well as fur. The shape slider beneath allows you to adjust how skewed towards the root or tip of the hair the effect is skewed.
- Length: This lets you set the child length as a proportion of the parents full length. Set to 1 for full length hair, or lower for shorter hair. To add some randomness to the hair length, use the threshold setting below to determine how many particles reache full length, vs how many are shortened back towards the child length. This gives you nice feathered ends to the hair rather than a neat straight cut look.
- Uniform Rough: Adds a global roughness to the hair that affects all the particles along their whole length. Often looks very messy/weird with the default settings, but turning down the size option allows you to add some fine noise to the child hairs. Good for messy hair and fur.
- Endopoint Rough: This adds noise to the endpoints of the hairs, pushing them apart. Again the default settings can look kinda crazy, try turning down the amount and using the shape setting to just add some fine fraying to the ends of long hair.
- Random Rough: This setting is great for adding stray or flyaway hairs, which really add realism to a haircut. The amount and size settings work just like for uniform rough. Set the threshold to around 0.95 so that the random rough only affects a few hairs and then turn up the the amount and size settings to add bit of random messiness to the hair.
- Radius: (Simple Only) This specifies how closely simple child particles gather around their parents. Try to set it just big enough to fill in the gaps between hairs to give you most control over how much area your hair covers.
- Parting Controls (Interpolated Only): If you comb a nice parting into a single particle system, turning up the parting amount will cause child particles to pick a side rather than interpolating in between. Leave the angles set to zero for default behaviour, or tweak them to control the gradation between parting and non-parting regions.
- Kink Settings: These are great. I won’t go into them individually, as they’re pretty self explanatory. Use the amplitude setting to control the size of the effect, and the frequency to control the number of curls/braid repetitions/whatever along the length of the hair. The clump setting causes the effect to shrink as hairs clump together, and the flatness setting can be turned up to make the hair arrange itself into flat groups like in curled or crimped hair.
That’s it for now. Obviously I haven’t covered rendering hair yet, as that’s a big topic in itself, which I will probably cover in it’s own tutorial/guide at a later date. More tips:
- When editing particle hair systems, turn on “use material colour “ and set the colour of your hair material to something really light. It doesn’t matter if that’s not the colour you want it to look in you final render, it’ll make it much easier to see what’s going on in the viewport while you’re tweaking settings.
- Don’t try to comb complex forms like ringlets or waves into your parent particles. Instead use the kink controls where possible to accomplish that, and concentrate on the broad shape of the style with the parent particles.
- If you turn on point or tip select mode in while combing particles (look where you’d find edge/face/vertex select modes on the header bar in edit mode), you can select individual particles and even hide particles in particle edit mode just like normal edit mode. This is really useful for tweaking individual hairs.
- Also try just holding down “l” and waving your mouse over the particle system in edit mode to select a bunch of hairs at random, then move them about independently of the other hairs to create some messiness.
- When combing hair, turn up the “path steps” draw option in the tool options sidebar to give the hair paths more subdivisions. This makes combing long hair easier. You can also turn up this setting in the display sub-panel of the particle settings to draw more subdivisions when in object mode too.
Update: Even More Tips! I’ve been doing some more hair lately and have a couple of extra tips to share. Here they are:
- Another great tip if you’re doing longer hair - turn up the “segments” setting before you start editing you hair. This gives you more control points to work with when combing and moving hair. Don’t set it too high though, or you’ll just be giving yourself more work trying to get nice smooth curves. Aim for a balance between control and ease of use. The default of six is fine for short hair.
- The “radial” kink setting is handy for adding volume to hair. Try setting the shape value negative and turning up the amplitude to bulge out the middle stretch of the strands.
- One issue with the comb tool is that it tends to push hair into a single layer as you comb more and more. To fix this and put back some volume, select some hairs at random and comb them in/outwards to fill out the shape a little.
- The “deflect emitter” setting in the comb tools sidebar is handy early on for preventing your hair system intersecting with your mesh. Later on though it can get in your way sometimes, try turning it off for finer control of hairs that are close to the emitter.
- Alternatively, you can turn “deflect emitter” up to push the hairs further away from the emitter.
- A really important factor in a good haircut is the silhouette. To get a feel for how the silhouette looks in isolation, set the material colour for your hair to black (make sure you have “use material colour turned on in the particle settings) and take a look at it from various angles, and work on outline. Aim for nice smooth curves.
Hair Caps If you’re working on a mesh you want to animate, or if you think you might want to alter your heads topology later on, it might be wise to attach the hair system to a separate mesh from the head, so you can work on one without affecting the other. This is easy to accomplish by going into edit mode and selecting the faces you want to grow hair from, then duplicating these and pressing “P” to part the new faces from the head object. This creates a safe object to create your particle system on, letting you go back and edit the head as needed. You can also turn off any inessential modifiers (like subsurf or multires) on this mesh to keep your computer happy.
Comments
Chapter 6, Part III « Fax on Blender (Mar 11, 2011)
[…] Ben Simonds, a talented guy whose blog I’ve linked to from the beginning, recently wrote an awesome article on hair that goes into more detail. He explains the workflow and some of those buttons and sliders to […]
Ben Simonds (Feb 25, 2011)
Thanks ScaroDJ, I’ve put a note in the post about this. Basically in older builds simple child particles used the option “particles”, and interpolated particles were labelled “faces”. They work the same, but the names have changed (I think they make more sense now).
scarodj (Feb 25, 2011)
“Umm… Upgrades!” Neo - Matrix Reloaded.
Btw, I forgot to thank for the info, so, thanks!
Tutorial: Mit der 3D-Software Blender Haare erstellen | cgtutorials (Feb 25, 2011)
[…] Link 3D-Software, 3D-Tool, Haare erstellen, Tutorial […]
Волосы в Blender | BlenderNation Россия (Feb 25, 2011)
[…] Волосы в Blender GA_googleFillSlot("BN_Content_468x60_below_post"); […]
ScaroDj (Feb 24, 2011)
But, what build are you using? My children pane is a little different…
It says [None :: Particles :: Faces]
slobodan (Feb 19, 2011)
GREAT tutorial and article!…Thank you so much!
luksdm (Feb 21, 2011)
Great!!! I quoted it on my blog =) I hope you don’t mind. I gave you the credit of course.
Волосы в Blender at BlenderNation (Mar 10, 2011)
[…] Волосы в Blender […]
Hair in Blender | BlenderNation (Feb 19, 2011)
[…] including particle systems, combing/cutting/styling hair, and using the child particle settings.LinkHair in Blender Share this article GA_googleFillSlot("BN_Content_468x60_below_post"); Related NewsFeathers […]
iKlsR (Feb 19, 2011)
great post Ben. very useful!
tichy (Feb 19, 2011)
Nice. I played with hairs days ago, and stuck on some point … and now, you!
great! Thanks.
stephen (Feb 19, 2011)
Thank-you for an excellent tutorial.
Greg Zaal (Feb 18, 2011)
Wow very useful, thanks man :) now all we need it the dynamics ;) You’re my second favourite blenderer btw, after Robert Tiess ;)
Hair in Blender « BenSimonds.com « ThruDreamsgate's Blog (Feb 17, 2011)
[…] Simonds has posted an excellent hair tutorial on his site. ( Hair in Blender « BenSimonds.com. […]
barriallen1 (Feb 19, 2011)
Fantastic article, and something we could wait from you, Ben. Thanks a lot.
Milad Thaha (Feb 17, 2011)
Wow, right in time for my current project! Quite a lot to read there, so transferring to my PSP.
Thanks alot Ben!
Fax (Feb 17, 2011)
Awesome article! I’ve already played around with hair and don’t get me wrong, it CAN be fun even if you have no idea what you’re doing, but with the workflow you describe and all the tips you give I know I can start taking hair seriously. Fantastic stuff!
Tillman (Jun 27, 2011)
THANK YOU SO MUCH!!!!!!!!
Connor (Jun 29, 2011)
How do you get the hair to not just go through the mesh instead actually manuevering the way you want it to?
Ben Simonds (Jun 29, 2011)
Make sure you have Deflect Emitter turned on in the brush settings.
Frank_Robernson (Jun 20, 2011)
There is a great lack of people giving tutorials on Materials and texturing the hair in blender.
can some one shoot me finally with this issue.
Connor (Jul 05, 2011)
ok thanks!
retyrt (Jul 27, 2011)
Good tutorial !!!! nice :)
Connor (Jul 10, 2011)
…Let’s say I wanted to use hair dynamics for a simulation, i got the hair to bend properly, and it also has enough air under it, but when i start it on the time line it slowly sinks through the head again
Ben Simonds (Jul 11, 2011)
You can adjust the weighting on the hair for soft body simulation in particle mode with the weight tool. Weighting the parts that are sinking more heavily should make them stiffer and keep them from sinking.
electricalchimpanzeelearnstogeek (Aug 13, 2011)
hair is the best part of human, that’s make a difference between one model with another, and very hard part of modelling, i’ve spend 4-5 hours to make the hair, and it still not enough to make the model looks like what u want.haha
i just wanna ask something, do you know how to insert the hair particles to unity 3d game engine? cause, everytime i insert my model, he’s going to be a bald, the hair isn’t exist, do you know how to fix it, someone was said if i change the particles to the mesh, it will be fine, but isn’t work
sorry for my bad english
greetings from Indonesia :)
Ben Simonds (Aug 13, 2011)
I’m not familiar with unity, but I presume it requires hair be geometry based. If I recall correctly this might be a good tut on that topic: http://www.paultosca.com/varga_hair.html
electricalchimpanzeelearnstogeek (Aug 13, 2011)
nice, thank u very much sir :)
Jess (Sep 04, 2011)
is there a way to select several particle systems in particle mode at once? I’m trying to put highlights and darker strands in my model’s hair using a seperate particle systems and it’s proving to be a pain. Or, alternatively, is there a way to add highlights to one particle system?
Ben Simonds (Sep 05, 2011)
If your hair emitter has UV co-ordinates, then you can use a texture to define the hair emission colour.
Jess (Sep 11, 2011)
Cool, I think I got it. Thanks :D
الحلقة المفقودة (Sep 30, 2011)
love for ever
40+ Highly Useful but Rarely Collected Blender’s Tutorials | Dzineblog360 (Dec 04, 2011)
[…] Hair in Blender […]
Digster (Jan 24, 2012)
when trying to render after going through your tut, Blender freezes on me what would cause this
Ben Simonds (Jan 25, 2012)
Too many particles maybe. Depends on a lot of things. If you machine can’t handle it that would be a good guess.
Araoluwa (Nov 12, 2011)
wish to get more info
Raven Jenson Llena (Mar 24, 2012)
crap…i hate reading…don’t you have any video tutorials i could look at??
Blender Tutorial : Hair in Blender | All CG Tutorials (Jul 16, 2012)
[…] Tutorial Link […]
Ben Simonds (Mar 29, 2012)
I have some on blendercookie. Try there.
Ben Simonds (Apr 26, 2013)
I don’t think there is unfortunately. This one of the reasons to use a separate mesh for hair, and also to make sure you apply any deformations before working on a hair particle system.
123456 (Sep 28, 2012)
big up blender
chuimaster (Mar 18, 2013)
el cabello de mi personaje no se mueve junto con él cuando deseo molerlo éste se queda fijo en un sitio mientras el personaje sigue moviéndose que hice mal?
Translation:
“the hair of my character does not move along with it when I want to grind it stays fixed in one place while the character is moving I did wrong?”
shalini (Apr 26, 2013)
Hi, I have a doubt, i’ve a model and created hair on the same mesh using particle, i have also completed the UV and texturing for it and now I got to give the model for rigging, but before rigging i want to freeze translate the mesh values, but now when i give freeze translation- the hair particle on the face mesh is changing… IS THERE ANY OPTION OR ANY METHOD TO AVOID THIS CHANGE ON THE HAIR ?????
Ben Simonds (Mar 18, 2013)
If you’re using a hair cap or something similar, make sure this gets parented to your head mesh/rig.
Glenn Wolf (Aug 27, 2013)
hi.
Got your book, it’s excellent. i’m having issues w/ hair though : i’m trying to do a girlie w/ long hair, but when i’m combing the hair over and down my scalp mesh i can’t stop it going inside the mesh, leaving a bald look. i’ve tried setting the Deflect Emitter etc, but that didn’t seem to help. i tried upping the number of Steps too, thinking maybe the segments were too long to make a decent curve, but that didn’t seem to help much either. as for other stuff, like setting the gravity that i saw in another tute, the hair just totally fell through and didn’t seem to register the scalp mesh at all.
i was wanting to do some simple animations but i’m wondering if i should just sculpt and rig the hair instead :-/
Guia para criar cabelos no Blender 2.5 - Allan Brito (Jul 11, 2013)
[…] um pouco mais sobre esse tipo de elemento para caracterizar personagens, existe um excelente guia para configurar e ajustar cabelos no Blender criado pelo artista Ben Simonds, que explica muito do que precisamos conhecer para ter controle […]
Tamara (Sep 14, 2013)
I was wondering about constraining hair with ponytail holders, pins, etc…
Norma (Mar 12, 2016)
I see you don’t monetize your blog, i think there is one opportunity to
earn extra $$$ on your website, search in google for- idol4jp makes money
How To Apply A Material To Hair In Blender | Information (Aug 29, 2016)
[…] Hair in Blender | BenSimonds.com – … turn on “use material colour ” and set the colour of your hair material to … the hair in blender. … for hair, and also to make sure you apply any … […]
Guia para criar cabelos no Blender 2.5 – Allan Brito (May 24, 2017)
[…] um pouco mais sobre esse tipo de elemento para caracterizar personagens, existe um excelente guia para configurar e ajustar cabelos no Blender criado pelo artista Ben Simonds, que explica muito do que precisamos conhecer para ter controle […]
balsamo para barba (Jan 19, 2021)
El vello facial al igual que el tipo de peinado, influye en la percepción que los demás tienen de ti, porque seamos sinceros, la apariencia importa y las primeras impresiones sobre desconocidos dependen en gran medida de ello.
2.5, blender, blender 2.5, child particles, fur, hair, hairstyles, particle settings, particles, resources, tutorial, tutorials — Feb 17, 2011