
Multi Quicktime Add-On
I’ve been working on a new script at Gecko for a side-project of ours in for which we need to generate a lot of video files at different sizes and in different codecs. Because we were processing the frames for these videos in blender we wanted a solution that could just take those rendered frames and produce all of the videos we needed. Enter a nifty command line tool called qt_tools and some python scripting!
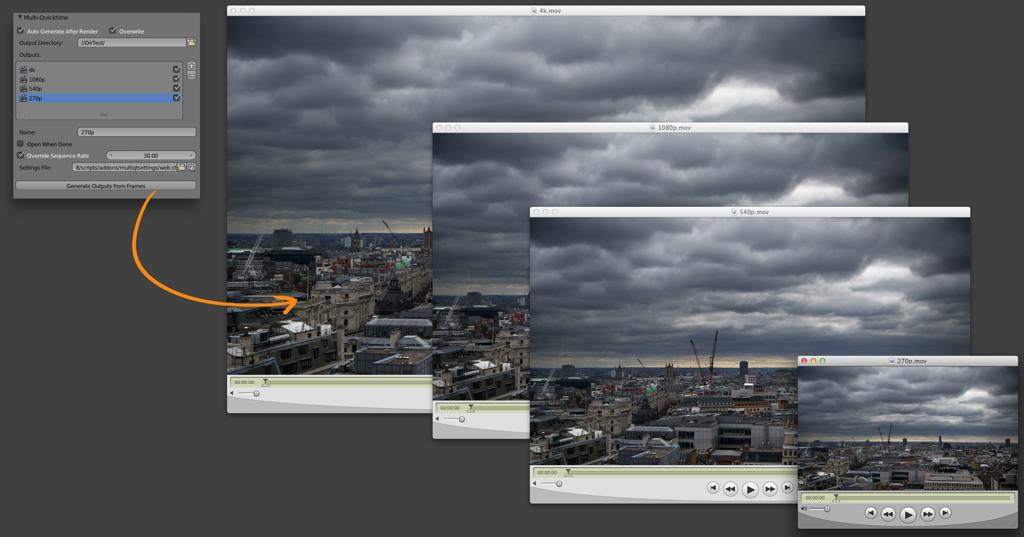
The script I came up with lets you specify a list of different output files that you want to create, and define settings for each using different settings files. Then you can either manually set off an export of each of these videos from your rendered frames, or have the export automatically happen after you finish rendering your animation. And because qt_tools has access to all of the codecs and soforth that quicktime does, you have a lot of flexibility in what kinds of video you can make (more than blender has natively as far as quicktime is concerned anyway).
You can also use the script just to create a single file. This is great for when you want to render out a playblast or a low quality render, and get a quicktime I can quickly send to a client, but I don’t want to render straight to quicktime in case I get a dropped-frame, or I already have some of the animation rendered. I’ve even included an Auto open option to automatically open the resulting file in Quicktime Player 7 once finished.
Instructions:
Important: The script requires you have qt_tools installed for it to work in its current state (see To Do list), which means you’ll need to be on a Mac too. 1. Download, Install, and Enable the addon. 2. Look in the Render Tab of the Properties Editor, under Multi-Quicktime. 3. Click “Add Multi Quicktime Output” to create at least one output file. 4. Configure a new settings file or browse for an existing one if you’ve created one before. Clicking on the configure button will bring up the same settings dialog that Quicktime uses natively. Set other properties as desired:
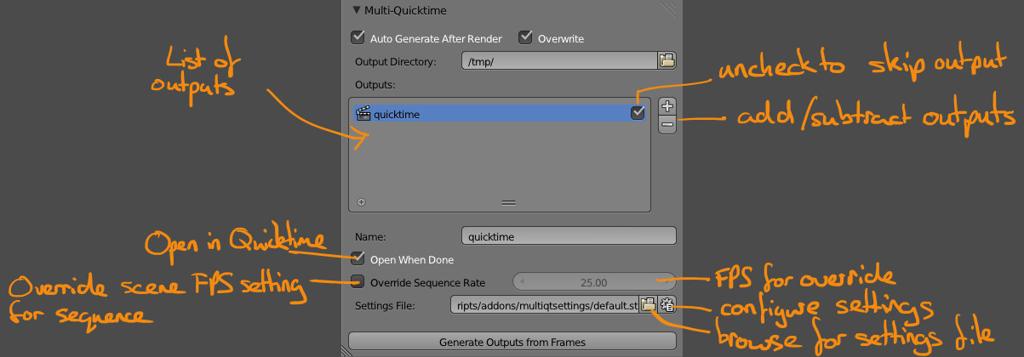
5. Either manually generate your quicktime outputs with “Generate Outputs fro Frames”, or enable “Auto Generate After Render” and render your animation.
To Do:
The script is currently very Mac OS centric, and in particular it is very tailored to my personal setup.
- I use Djv for playing back frames, but it doesn’t open quicktime files, so the auto open feature defualts to using Quicktime Player 7.
- qt_tools could easily be replaced by FFMPEG or another command line video tool if this was what you preferred (though you would then have to do more work defining codec options in the script I think).
So far we’re still testing the script but I’m pretty happy with how it’s working. If you do try it out please let me know of any bugs/usability issues.
Comments
Spirou4D (Oct 17, 2013)
Hi bensimonds,
A very nice project but on windows I must to wait…
At soon!
Spirou4D
Stephen Hamacek (@HamacekS) (Dec 11, 2013)
Cool, gonna give this a go. At least could save doing the whole ‘open image sequence and resave’ rigmarole. Cheers.
Stephen Hamacek (@HamacekS) (Dec 11, 2013)
All installed ok, but when I click the configure button, nothing happens. Not sure what could be going wrong. I’m on 10.7.5 and Blender 2.69 (with a 3/12/13 nightly build atm)
Ben Simonds (Dec 12, 2013)
And you have qt tools installed? Does the terminal say anything?
Mike (Apr 16, 2015)
I installed the qt_tools and built an applescript app to export a batch of files to a QT setting plist using xgrid in snow leopard server. Several cores work on the batch from many macs. All files get exported and logs get written. If you’re interested hit me up.
automation, blender, python, qt_tools, quicktime, scripting, uncategorized, video — Oct 14, 2013